No event has yet been logged for today's date. Please get in touch if you know of a significant anniversary relating to a disused structure or railway construction.
Featured videos...
Join us socially...
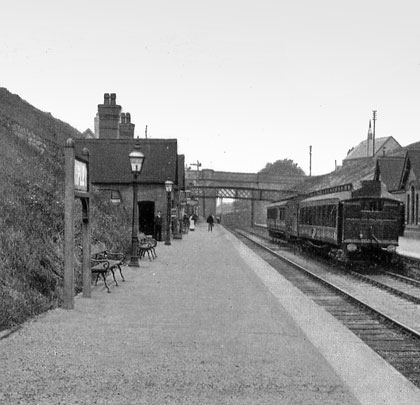
Willoughby-Woodford & Hinton
Willoughby-Woodford & Hinton
1/7
<>
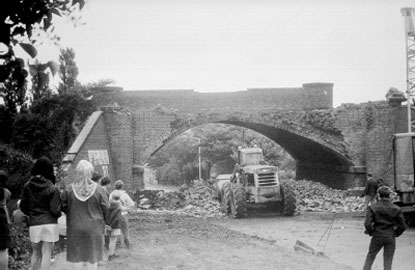
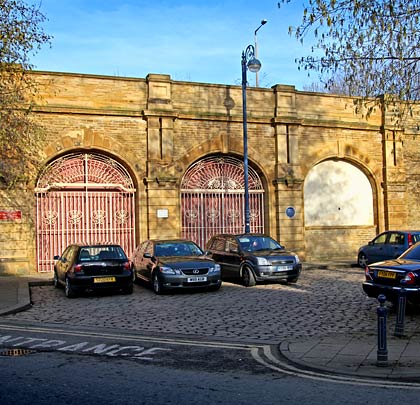
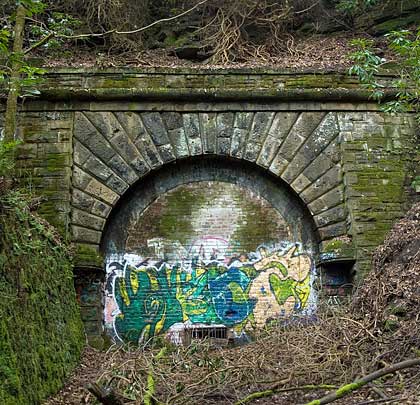
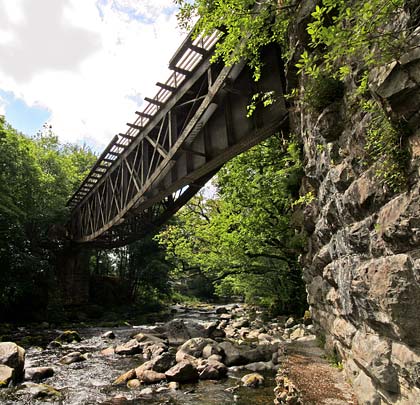
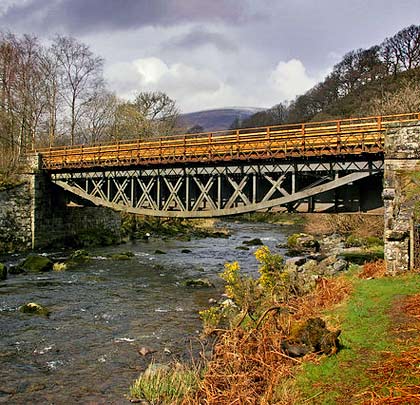
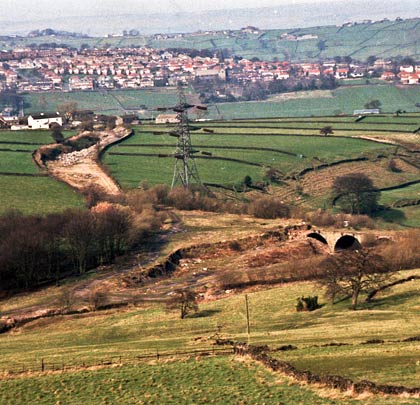
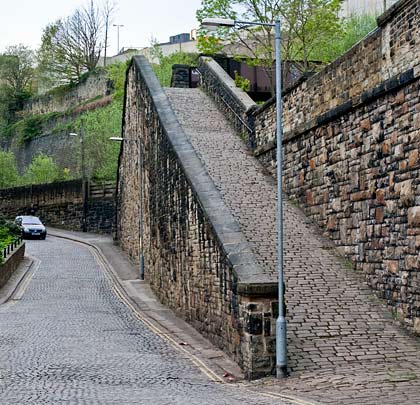
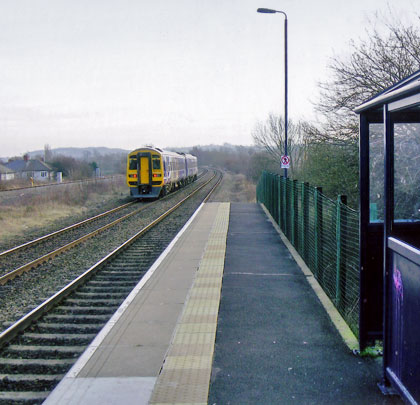
A view showing the west side of Willoughby Viaduct which has been demolished since closure.
The Southern Division section of the Great Central Railway’s ‘London Extension’ began at Rugby and ended at Quainton Road. The first contract within this part – officially No.4 – extended south from Rugby to terminate at Charwelton, a distance of about 12 miles 64 chains. The point where it was originally due to end was changed to bridge No.499, about 70 chains south of Woodford & Hinton Station. This structure carried what was at that time the East & West Junction line which ran between Towcester and Stratford-upon-Avon. The change was necessitated by the extremely difficult nature of the ground in the vicinity of the proposed bridge. As a consequence, the initial portion of contract No.5 was added to No.4 by mutual agreement. The removal of the material which formed the cutting immediately north of the bridge became far easier to undertake.
Six companies tendered for the contract and Thomas Oliver of Rugby was successful with a price of £513,308. The other offers were all in excess of that figure, with one from Monk & Newell of nearly £800,000. It employed 2,000 men, 20 locomotives, eight steam navvies and 550 wagons, ending 137 miles 34 chains from Manchester. The civil engineering works that are part of this study are all towards its southern end and accepted their first revenue-earning traffic on 25th July 1898.
Three viaducts
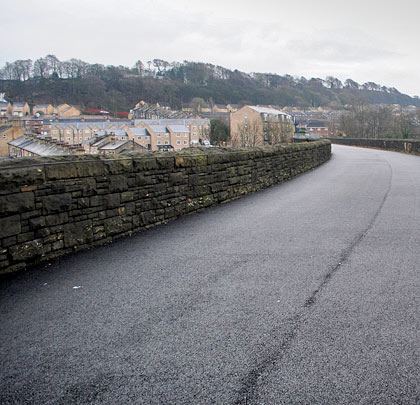
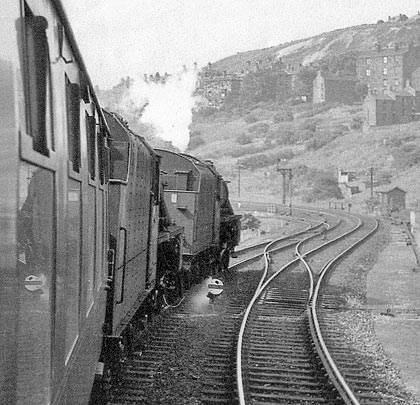
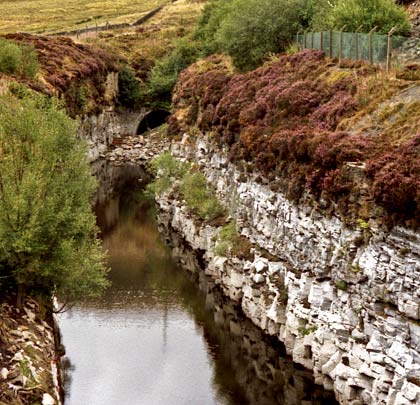
Willoughby Viaduct was the first major work in the area. It stood 54 chains south of the station of that name and crossed the valley of the River Leam. It consisted of 13 arches, each 34’3” in span, was about 40 feet high and 186 yards long. Perhaps its main feature was that the piers were not tapered, having vertical faces on all sides.
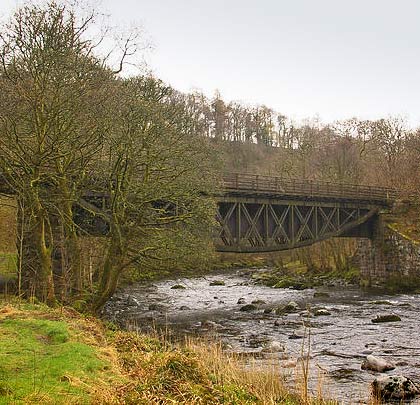
Heading south, the line passed through countryside which became hilly. The Leam was crossed twice as a result, firstly by Staverton Viaduct. This was 119 yards long, comprising nine arches again with spans of 34’3”. It was structure No.484. The foundations were taken well into the strong blue lias clay and were in the order of 15 feet below ground level. The viaduct was built on a gradient of 1:176 rising to the south, the rails being about 60 feet above ground level at their highest.
The entire work was provided with inverts but, despite the engineers’ precautions, it was noticed that some movement had taken place at the northern end. It was late in 1897 when the work was complete but, after checking measurements, the northern abutment was found to have moved by around 4 inches at springing level and a little more at the arch. Upon examination of the first pier, an almost parallel shift had occurred to the south. The inverts had been crushed and a 4-inch wide gap had developed, crossing the site from the north-west to the south-east.
The situation required much remedial work. The first three piers were shored up with timber, then the inverts were rebuilt. Massive strengthening walls were constructed around the viaduct, with pier No.1 having solid concrete walls 30 feet long and 10 feet thick being set well below the level of the slip that had caused so much trouble. On completion of these measures, it was determined that no further movement had taken place.
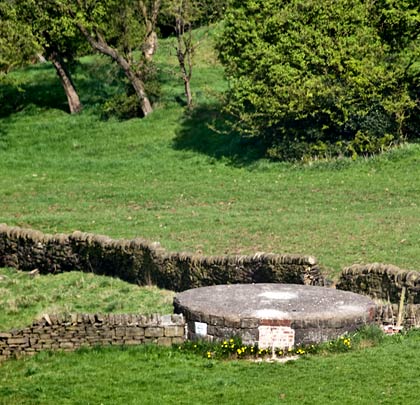
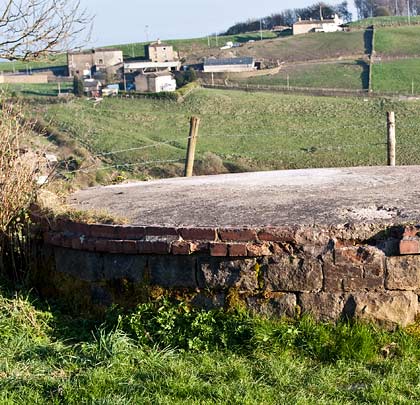
About 25 chains south of the viaduct was bridge No.485, situated in the approximate centre of a cutting. This large structure was built just to carry a farmer’s track and footpath!
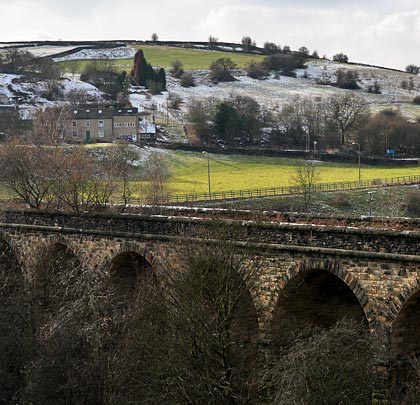
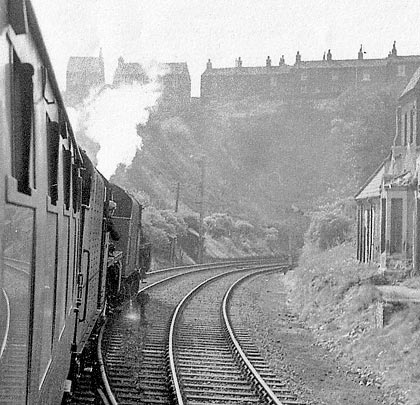
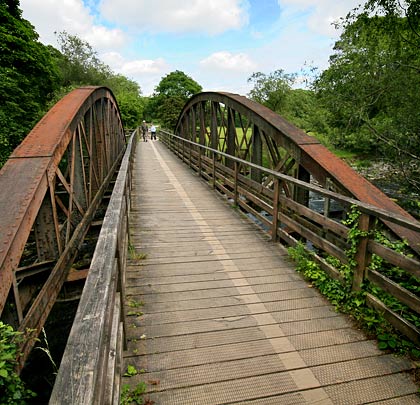
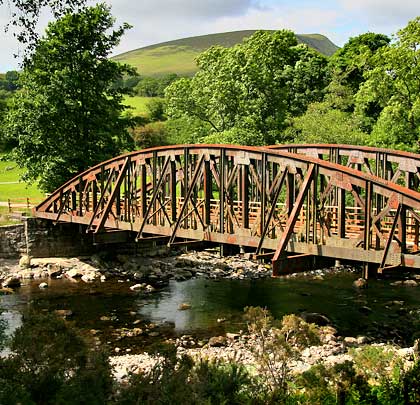
A little further south the Leam was crossed again, this time by Catesby Viaduct – structure No.486. It was a very similar design to that just described at Staverton but was somewhat larger. 159 yards long, it was made up of 12 arches, 34’3” at the springing. The piers were 5’3” wide at that height and in side elevation tapered at the rate of 1:30. Transversely they had a taper of 1:24, with the king pier 13’1½” wide. It was a little higher than its neighbour at 63 feet but the foundations were made in similar ground. Work was carried out to prevent slippage of nearby land, and inverts – either whole or partial – were constructed under all the piers. To complete the job, the surface of the viaduct was given a five-layer covering – three of asphalt and two of brattice cloth, applied alternately. The viaduct was straight in plan and lay on a 1:176 gradient, rising to the south.
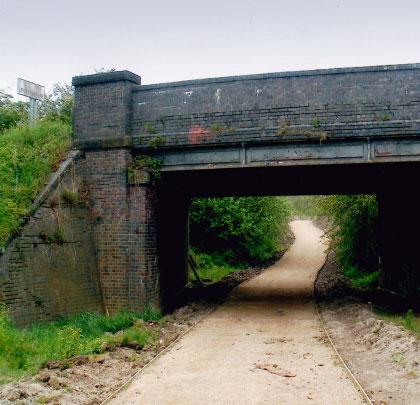
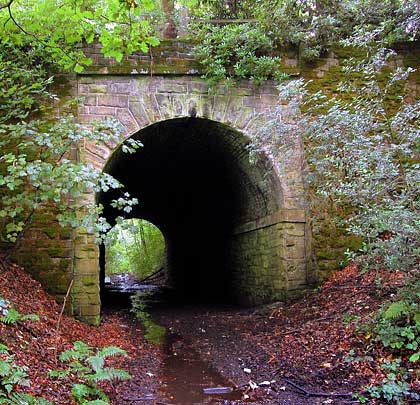
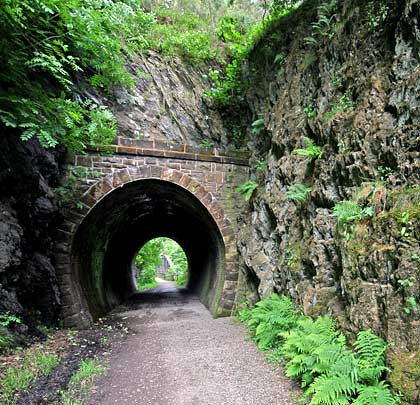
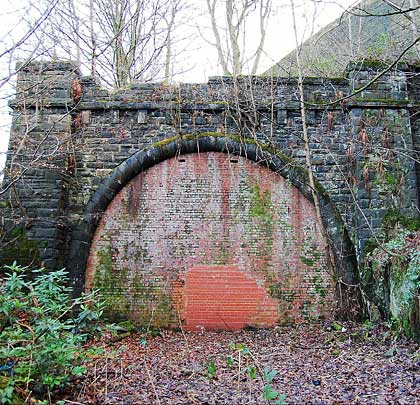
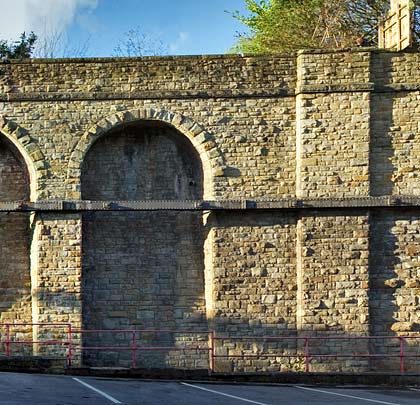
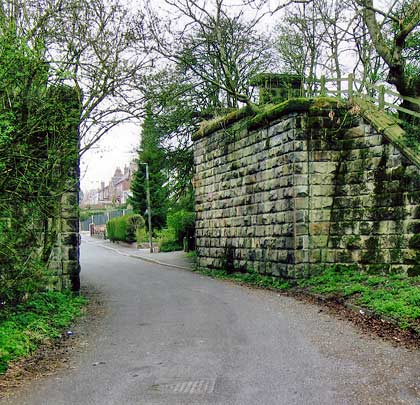
An accommodation bridge through the embankment at the south end of Catesby Viaduct. Photo: Four by Three
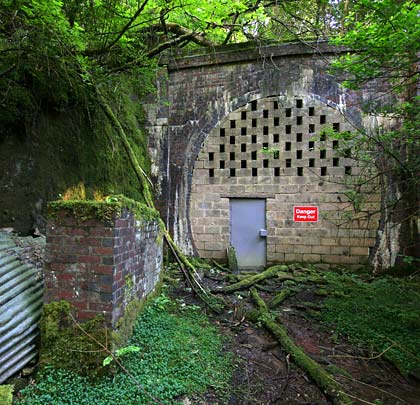
The next bridge was No.487, built at the southern end of an embankment. It was another example of the engineer’s desire to avoid level crossings and spanned a public footpath which connected Staverton with Lower Catesby. An overbridge soon followed – No.488 – and this stood only a matter of about 3½ chains from the north portal of Catesby Tunnel. Although its lower part was built in blue brindles, the upper section was made of about 4’6” of dressed stone, consisting of eight courses. Why this approach was taken is unknown but was probably at the request of the owner of nearby Catesby House.
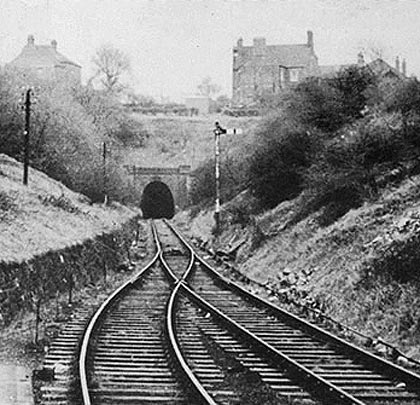
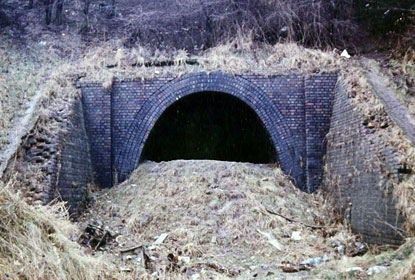
The tunnel
The GC had little choice but to build a tunnel here, when a cutting would probably have been feasible. The owner of Catesby House insisted on this, otherwise it would have overlooked the line. His home did have a certain notoriety as it was where the conspirators in the 1605 Gunpower Plot met on occasions, although this has been disputed in recent years.
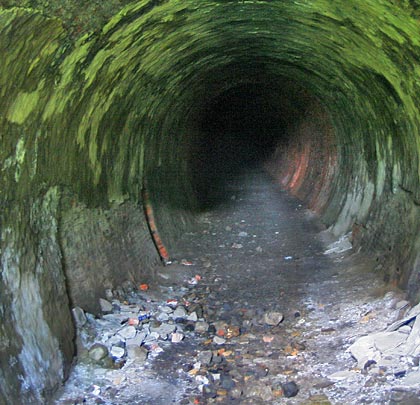
The tunnel is just short of 3,000 yards long, 27 feet wide and 25’6” high. The whole of the brickwork was faced with brindles which were laid in cement where necessary. It was driven from nine shafts and a small opening in shallow ground. The landowner was unhelpful as a shaft within 500 yards of the northern entrance was not allowed. The first 44 yards were built by ‘cut and cover’, the heading then being driven to meet it. Large volumes of water were diverted into the brick culvert in the six-foot. Five shafts were later lined to ventilate the bore, the most northerly having to be 15 feet in diameter as it was ¾ mile from the entrance. The other four were 10 feet in diameter. The tunnel was straight and built on a gradient of 1:176 which was against southbound trains.
The greatest error in its construction was 1½” out of centre but, in most cases, it was as little as ⅛-¼”. Nearly 290,000 cubic yards of material were removed and about 30 million bricks laid. Construction started on 18th February 1895, with the last length being keyed in on 22nd May 1897. This was claimed as a record in tunnel building. The average rate of work was 110 yards per month, beginning with the first shaft. The best progress was at a rate of 18 feet per day.
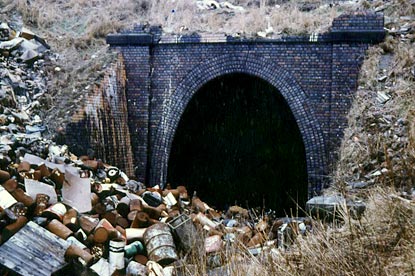
On 27th September 1969, explorers leave the southern end of the tunnel. Photo: J Mann
South through Charwelton
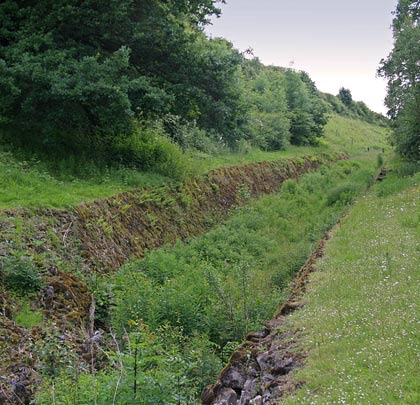
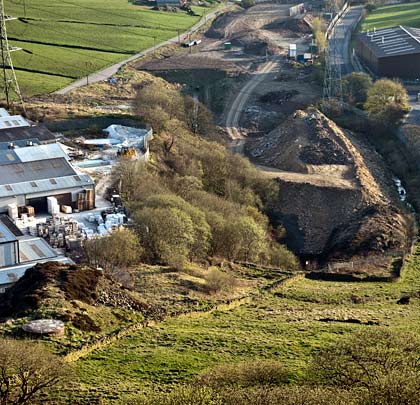
The tunnel opened out into a cutting which had contained more than 410,000 cubic yards of earthwork. Near here was the highest point on the London Extension, at 503 feet above datum. At the south end of this cutting, a single span iron bridge carried the Priors Marston to Preston Capes road. This was No.489. Immediately beyond was Charwelton Station which was of the standard country type, the platform being accessed by a road overbridge, No.490. A little further on stood bridge No.491, built for the convenience of the late Lord Knightley who lived at nearby Fawsley Park.
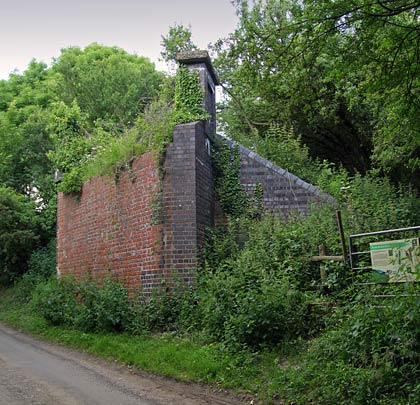
The land was now much more favourable for railway construction and, in late 1903, Charwelton water troughs were completed. They were about ½ mile long and provided the company’s traffic department much greater operating flexibility. Continuing south, the large goods yard, locomotive shed and wagon shops were laid out, with much of this area being created using spoil from the tunnel. The station at Woodford & Hinton was established at the southern end of this complex of tracks. It was another example of the country design but was approached by steps from the road below. As the importance of Woodford increased, the station was completely rebuilt to the form that existed on closure.
Immediately south was the junction for Byefield and the East & West Junction line. Then came bridge No.498 carrying a minor road. This was another large and very attractive structure. Contract No.4 ended on the north side of the next bridge, No.499, where the East & West passed over the GC.
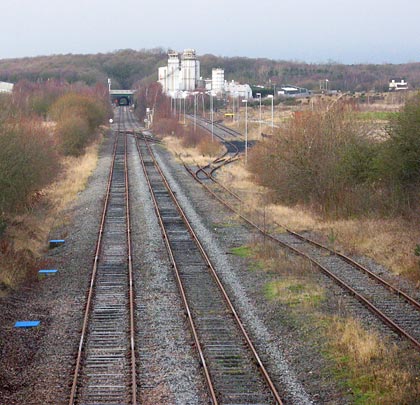
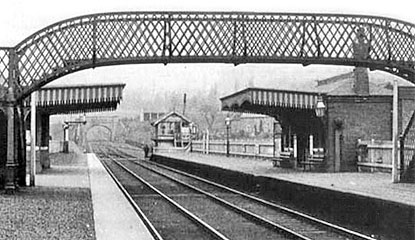
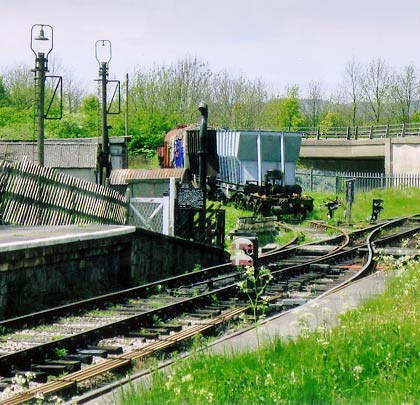
A lone signal gantry guards the trackbed to the south of Woodford Halse. Photo: Four by Three
When the trains had gone
The Great Central main line closed as a through railway on 3rd September 1966, including the section that has been described here. For several years thereafter, it was possible to walk through the tunnel, the southern entrance at least not being fitted with any kind of barrier. However, British Rail eventually added large steel gates at both ends, with smaller gates provided for maintenance purposes.
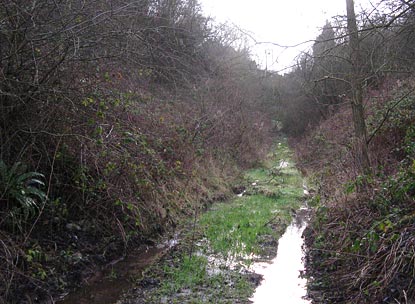
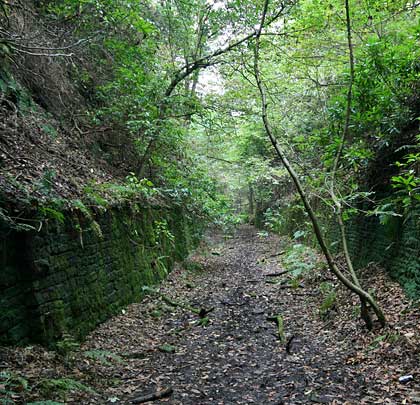
Apart from this, nature has continually worked to reclaim the land that Thomas Oliver’s navvies tore apart. Indeed it is becoming very difficult to photograph the line’s remains because of this. Many of the structures are extant but notable exceptions are the viaducts at Willoughby and Staverton, and the road bridge which gave passengers access to Charwelton Station. Catesby Viaduct is not in good condition – its fate is uncertain and may not survive much longer without serious maintenance. This of course is highly unlikely.
An unfortunate derailment occurred inside Catesby Tunnel on 4th January 1906. As the 3.25pm Marylebone-Manchester express was running through, the rear vehicles left the rails. The cause of the accident was later determined as a broken rail. Fortunately there were no serious injuries to passengers. The tunnel has recently been considered for further railway use in connection with the London-Birmingham high speed line, promoted as HS2. The idea, now abandoned, was to use the tunnel for one track, with a new tunnel bored for the other.
Many thanks to Adam Goodwin of the Record Office for Leicestershire, Leicester & Rutland for his assistance and permission to publish the photographs taken by Mr S W A Newton.
Dec10
Willoughby-Woodford & Hinton
The Swadlincote Loop
1/9
<>
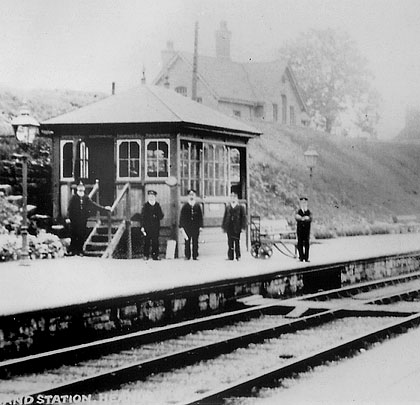
The Midland's fabulous signal box at Swadlincote Junction controlled movements onto the Loop at its northern end.
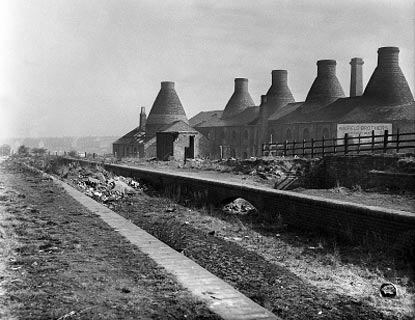
The town of Swadlincote is situated in the southern tip of Derbyshire, about 15 miles south of Derby and five miles east of the Staffordshire brewery town of Burton-on-Trent. Geographically it lies in a valley with hills on three sides and an open aspect facing west. The area was rich in coal and clay deposits which attracted a considerable amount of industry. Indeed by the end of the 19th century it is believed that, with an annual output of over three million tons, coal production in Leicestershire and South Derbyshire accounted for just over 1% of national coal production.
At various times, from the beginning of the 19th century until the demise of the coal industry in the 1980s, there have been around 60 brick and pipe yards – often with adjacent clay pits – and 15 large collieries in the Swadlincote area. The skyline was full of colliery head stocks, bottle kilns and giant chimneys belching smoke. Amongst all the industry was an elaborate system of railways – mostly standard gauge but with narrow gauge tracks to serve the pits and clay holes. For a time there was even a 3’6” gauge tramway which wound its way through the industrial landscape.
The first railway to reach the area was the Swadlincote Railway, instigated in 1826 and completed the following year. The line ran for three miles from Overseal Spring Cottage to Wideshaft Pit via Gresley Common. It is believed that this railway was built to a gauge of 4’2” with the rails being fastened into stone blocks set in the ground. In 1833, six years after the completion of the horse-drawn Swadlincote Railway, the Leicester to Swannington railway opened, the first local line to use steam locomotives. Like the earlier line, it ran from a canal – in this case the River Soar Navigation – to an industrial area rich with mineral deposits.
The next arrival was the Birmingham & Derby Junction Railway, running between the places in its title and putting Burton-on-Trent on the railway map. At Derby, the B&DJR met two other railways – the Midland Counties and the North Midland. All three companies amalgamated in 1844 to form the Midland Railway.
In 1845 the Midland took over the Leicester & Swannington Railway and the Ashby Canal, with a view to converting the latter into a railway. In 1848 the Leicester and Swannington line was extended by the Midland through South Derbyshire to Burton-on-Trent, whilst at the Leicester end the line was extended and improved to connect with the former Midland Counties Railway. It is from the Burton to Leicester line that the Swadlincote loop left and rejoined after a circuitous route of just over seven miles which it took in some of the most heavily industrialised areas of South Derbyshire.
Origins and development
The Swadlincote loop had its origins from two quite independent branches off the Burton to Leicester line. The first section to consider is that from Swadlincote Junction to Swadlincote. This section was authorised under the Midland Railway (Leicester and Swannington Alteration) Act of 1846 and although recorded as opening to passengers in 1851 much of the line had been completed by as early as September 1849. There were several collieries on the stretch of land from Cadley Hill to Swadlincote and apart from the curve from the junction with the main line the rest of the branch into Swadlincote was completely straight, a distance of just under two miles. A siding for Hall and Boardman’s at Swadlincote was the first off the branch, opened in 1852 with a second being added in 1854.
Throughout its entire history, the line was affected by mining subsidence with this first being recorded as early as 1857 when the Midland Railway was offered the purchase of the unmined seams to maintain the level of the line. The company declined the offer, instead choosing to monitor the track and maintain a supply of ballast at Swadlincote so that it could be raised when subsidence occurred. Passenger services to Swadlincote were withdrawn in October 1853 and the line was purely a coal and pottery branch until their reintroduction on 1st June 1864.
During the period covered so far, a second branch from the Leicester to Burton line was constructed to Wooden Box. Authorised by the Midland Railway (Burton-upon-Trent to Nuneaton Act) 1846, this line ran from its junction with the main line through Swains Park and the Gresley and Albert Village districts to a terminus just beyond the Ashby to Burton turnpike road at Wooden Box. It remained in use as Wooden Box until it was renamed Woodville on 1st October 1868.
Woodville Tunnel captured shortly after closure but before its approach cutting was infilled. Photo: Magic Attic (Swadlincote)
The line to Woodville was opened to goods traffic as early as 1850; however like its neighbour, the Swadlincote branch, the line was also closed for a period between 1st October 1856 and 1st April 1859 when a passenger service was also started. Over the years, feeder branches were constructed to serve the numerous industries which had developed in the area, the most notable of which served Granville and Church Gresley collieries, John Knowles pipe yard and T G Green’s pottery.
It was not until the 1870s that it was decided to join the Swadlincote and Woodville branches together, thus making it a through route from Burton to Leicester. The Midland Railway (Additional Powers) Act 1875 (Woodville to Swadlincote) authorised the construction of the line. Originally it was intended that the loop would join the two existing termini but the lie of the land made this impractical. Even as built, the steep climb from Swadlincote to Woodville presented many problems which often necessitated the double-heading of most heavy trains over the loop.
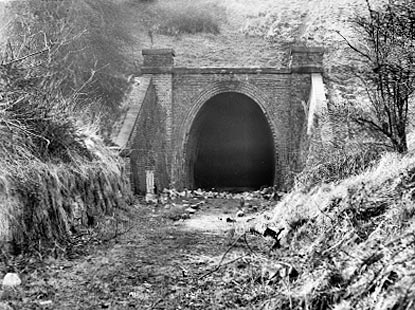
A Swadlincote and Woodville Construction Committee was formed in 1875 to supervise the construction of the line. Its course involved two tunnels, the first at Midway (104 yards) and the second at Woodville (307 yards), both of which were required to take the line beneath the Burton to Ashby turnpike, as well as numerous cuttings and embankments to overcome the landscape’s undulations.
This alignment demanded the construction of a new station at Woodville. Originally, the Midland Railway had intended to build it immediately to the south of Hartshorne Road. However, this proposal enraged the inhabitants of Woodville who felt that the location better served the neighbouring village of Hartshorne rather than their own, so much so that the Midland were petitioned on the subject. Not wanting to be seen as insensitive to local inhabitants, the Midland chose a more central site for the station approximately a quarter of a mile further south.
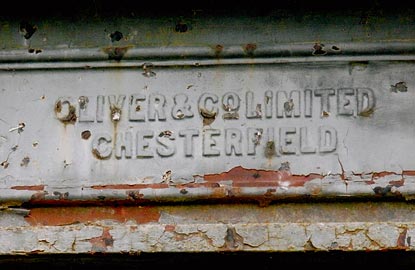
Oliver & Co, the name emblazoned on the ironwork of Moira Road bridge. Photo: Simon Swain
Work on the new line commenced in 1880 and by the end of that year there were reported to be 257 men, 18 horses and three engines engaged on the construction. By December 1881 only one of the portals to Woodville Tunnel remained unfinished but, elsewhere, numerous slips in the cuttings and on the embankments hindered progress. By September 1882 it was reported that the line had been laid in its entirety and the contractor was finishing off. New stations were built at Swadlincote and Woodville, the structures at each being identical. The typical Midland Railway brick main buildings were on the town side with wooden waiting rooms provided on the opposite platforms. The line was single track throughout, with loops provided at the stations to enable trains to pass.
The Midland Railway took possession of the extension from the contractor on 1st January 1883 with passenger services over the loop commencing on 1st May. The extension from the new station at Woodville to the junction with the original Woodville Goods branch opened on 1st September 1884. Upon completion of the new line the earlier Woodville terminus became a goods depot, the separate route often being referred to as ‘The Old Road’.
Architectural detail at Woodville Station. Photo: Simon Swain collection
The route described
The best place to start a description of the loop line is at its northern end. Shortly after diverging from the Derby to Birmingham railway, the Burton-on-Trent to Leicester line crosses the River Trent and its washlands on the 16-arch Stapenhill Viaduct, passing thus into Derbyshire. On the right were the grounds of Drakelow Hall, the ancestral home of the Gresley family, one of whose descendants, Sir Nigel Gresley, was to achieve fame as the designer of the A4 Pacific ‘Mallard’, holder of the world speed record for a steam locomotive. In the 1950s a massive power station was constructed in the grounds which proved to be a major source of freight traffic for the Leicester line.
After passing beneath the road to Stanton House, the first junction reached was Bretby Junction where the branch to Bretby Colliery diverged – the divergence of traffic here being controlled by a signal box between 1868 and 1952, after which traffic was controlled by a ground frame. The branch was constructed by the Midland Railway and opened on 1st October 1868. It was operated on a ‘one engine in steam’ principle and had a speed limit of 15mph.
Midway’s 104-yard tunnel, before its mouth had been completely consumed by landfill in the mid-Seventies. Photo: Ian Gill
Forsaking the journey over the loop for a while, it is necessary to explore this 2½-mile branch which climbed north-eastwards through a cutting before passing beneath the present day A444 at Stanton, beyond which it diverged into two. The first branch on the right led to Bretby No.3 (or Stanton) pit and to Lakes Brickyard. A second branch, a short distance further on, made a trailing connection on the same side. Engines visiting the pit or brickyard would stop after the second junction and reverse up the branch, less severely graded than the southerly connection, but would leave by the steeper link.
The main branch continued past the Klondyke Brickyard and passed under the present day A511, just to the west of the Stanhope Arms, to reach Bretby Coal Wharf. A wooden platform was erected here for the benefit of the Earl of Caernarvon and his guests to alight when the occasional special train ventured up the branch for a shooting weekend at nearby Bretby Hall.
The colliery at Bretby closed in July 1960 to be replaced by a drift mine which was to close just six years later. The Bretby Colliery branch was officially closed on 1st June 1963 but was used until August 1968 for wagon storage. Today the site of the colliery has been totally cleared, although the winding house remains adjacent to Park Road. The course of the branch, although substantially overgrown, can still be discerned and the bridges over the A444 and A511 remain, complete with British Railways Board structure numbers.
The approach cutting to Woodville Tunnel is now backfilled and waterlogged. Photo: Simon Swain
Returning to the loop itself, this diverged approximately 500 yards beyond Bretby Junction at Swadlincote Junction which was controlled a 25-lever box. From here the line struck out in an easterly direction to shortly pass beneath the A444. In the early 1960s, an extensive marshalling yard was constructed when Cadley Hill Colliery was modernised. The old brick-built bridge was replaced by a concrete structure, a second span being required to cross the line into the colliery. Cadley Hill Colliery was sunk by Hall and Boardman in 1860 and was one of the last in South Derbyshire to close in March 1988. It was noteworthy as it was one of the last NCB collieries to use steam as motive power.
Once past Cadley Hill the line was surrounded by further industry. To the left was Hallfield’s pipe yard and the long disused Nadin’s colliery. A footpath to the right of the line followed the course of a branch line which once led to another colliery at Gresley Wood and a little further along was the site where, in the 1960s, the NCB built a test track for its underground locomotives. Beyond here was Swadlincote Colliery which closed in 1965. These two pits were once connected by a 1’11” narrow gauge railway running parallel to the loop.
Woodville Tunnel’s south portal captured in 1976. Photo: Ian Gill
Before entering the station at Swadlincote, the line crossed Darklands Road by means of a gated level crossing. Immediately prior to entering the station there were two sidings which diverged to the right. The first one served Ault’s Pottery, prior to this it had also served Cartwright’s Colliery which had closed as early as 1906. The second siding served Rowley’s Pottery which was situated adjacent to the station.
The station at Swadlincote was a simple affair, built to a standard Midland design consisting of two opposite platforms. The main buildings were situated on the Up side with a basic wooden shelter being provided on the Down. Passenger access to the station was via a driveway off Midland Road. In 1890 a footbridge was constructed at a cost of £250 to allow passengers to cross between platforms. This was removed around 1905 when Midland Road was bridged over the line to carry the Burton & Ashby Light Railway. At the same time the original road, which had crossed the line by a level crossing at the eastern end of the station, was renamed Lower Midland Road. From this point onwards access between the platforms was either by foot crossings at the end of the platforms or, in the case of the Down platform, via a path which descended from Midland Road.
Looking west from the Midland Road bridge at Swadlincote. Photo: Simon Swain collection
Leaving Swadlincote the line immediately passed beneath Midland Road. To the left of the line was the tram depot for the Burton & Ashby Light Railway. After the trams stopped running in 1927, these premises were to become the NCB central workshops. To the right was Swadlincote goods yard which was built on the site of the original Swadlincote terminus. The sidings of the yard extended some distance to the right across Belmont Street to the town’s gas works. The yard possessed two rail-mounted hand cranes for container traffic from the adjacent potteries. In pre-grouping days, the London & North Western Railway also had a goods office here.
Immediately beyond the yard the Wragg’s and Woodward’s industrial branch diverged right to cross Belmont Street on the level before passing beneath Church Street and continuing along in a deep cutting to reach the first pipe yard. So far this branch has followed the course of the old Swadlincote Railway but then deviated to pass beneath Hill Street before crossing Coppice Side on the level to enter the second pipe yard. Due to the steep gradients on this branch, a maximum of six wagons were allowed to be pushed up the gradient to guard against runaways. A large earth-filled stop block was built near to Belmont Street to cater for such eventualities.
Returning to the loop itself, the line passed beneath Midway Road and began a climb on a gradient of 1:40 through a deep cutting to pass beneath the present day A50 via the 104-yard Midway Tunnel. Numerous trains stalled on this gradient. On one occasion a locomotive failed in Midway Tunnel and had to be backed all the way to Swadlincote to take another run at it. On another occasion it is reported that a local freight took an hour to cover the two miles from Swadlincote to Woodville! After emerging from the tunnel, the line continued on an embankment to cross Hartshorne Road on a single-span red brick bridge. A short distance onwards the station at Woodville was reached.
Woodville Station was identical to Swadlincote in nearly every respect. Again the main buildings were located on the Up side, with only basic waiting facilities being provided on the Down. An unusual feature about the station was that the signal box was located on the Down platform. Access to the station was via Station Road and passengers always had to cross between platforms on board crossings situated at the west end of the station, no footbridge ever being provided. Behind the Down platform was a siding which served Mansfield Brothers sanitaryware works.
Upon leaving the station at Woodville, the line continued in a cutting for a short distance to pass beneath the Burton to Ashby road through the 307-yard Woodville tunnel. Emerging from the tunnel the line then passed the Woodville Sanitary pipe works and Albion Clay Company before passing beneath the Woodville to Moira road and then on an embankment to cross the Woodville to Albert Village road by means of a two-span steel bridge with brick abutments. Continuing down the embankment, the Woodville Goods branch joined from the right.
Like most of the goods branches, it was worked on the ‘one engine in steam’ principle and had a 15mph speed limit. On the way to the good station was a branch which diverged to the left to Granville Colliery and which also served Greens Hilltop works via a reversal and a steep climb. Granville Colliery had a particularly high output and its own internal shunting locos. Coming into the goods branch from the right was another branch from The Mount Pleasant Works. The company had an extensive standard gauge system; a signal box and crossing gates were provided where this branch crossed the Woodville to Albert Village road.
In the sidings for both branches was a run-around loop where freight trains bound for Woodville Goods would run round to the rear of their trains. From here the loco would push the wagons under the bridges of Swadlincote Road (A514) and Burton Road (A50) to the terminus of the line. After emerging from beneath the A50, the single line split into four sidings with the old station buildings, the goods shed and stable block to the right. The siding to the extreme right extended beyond the station and then curved through 90 degrees to the left to reach C W Outram’s Excelsior Pottery. The terminus at Woodville Goods was unusual in that there were no proper running round facilities without going through the goods shed, which was not permitted!
‘The Mercian’, headed by 45091, on the curve between Woodville and Woodville Junction on 2nd June 1957. Photo: Simon Swain collection
Returning to the loop line itself, the track passed over the A586 on a steel girder bridge soon after passing Woodville Goods Junction. As the line curved, a pair of sidings joined from the right which served Woodward’s Pipe Yard and Wragg’s Iron Foundry. Soon afterwards a vast expanse of sidings was reached serving the Gresley Colliery branch and Mansfield’s Pipe Yard. This branch was very steep and, like the other freight branches, had a 15mph speed limit. A noteworthy feature of this branch was that it curved sharply and continuously to the left finishing on top of an enormous spoil heap. The rails here were laid on steel sleepers rather than wooden ones as the bank was forever smouldering due to spontaneous combustion.
Once more returning to the loop, the line then crossed the Albert Village to Linton Road by means of Swain’s Park level crossing. With Moore’s Pipe Yard to the right, the line then descended to join the Burton to Leicester line.
For purposes of clarity and completion we will continue a little further along the Leicester line to explore the Moira junctions which are a prominent feature of the area’s railway history. Beyond the junction connections there were sidings either side of the Burton to Leicester line which served numerous pipe works. After passing beneath a blue-brick bridge carrying the road to Overseal, the main Burton to Leicester line branches diverged both to the left and right. The latter ran to serve Rawdon and Marquis collieries. Both of these were owned by the Moira Colliery Company which also owned Gresley Colliery. The line which ran to the right was the west curve of the triangular Moira junction and ran to Nuneaton via Shackerstone and Market Bosworth. It was jointly operated by the Midland and London & North Western Railway companies. This line lost its regular passenger services as early as 13th April 1931; however the large collieries at Donisthorpe and Measham ensured the line’s survival well into British Railways days.
Operational history, decline and closure
The Swadlincote Loop line ran through one of the most densely industrialised areas of South Derbyshire and as such freight services were always more predominant than passenger services. As we have seen, branches off the loop ran to serve individual collieries as well as pipe yards, potteries and clay pits. All of these branches generated their own traffic which then fed onto the loop line for transportation to destinations further afield.
A study of the working timetables for the period immediately prior to 1914 would appear to show that passenger workings were scheduled to run between freight workings – an indication that the former were of secondary concern. Throughout this period there were generally five passenger workings in the Down direction with six in the Up, usually consisting of two morning services, two afternoon services and one in the evening. Those in the Down direction all originated from Burton-on-Trent and either terminated at Ashby or Coalville, with only the occasional service running all the way through to Leicester. There was also one local return working from Burton to Woodville and back. Those services in the Up direction all originated from Ashby and Coalville and terminated at Burton. There is no evidence to suggest that there were ever any timetabled Sunday services. Therefore passengers wishing to travel to Leicester from Swadlincote and Woodville would either have to travel along the loop to Burton or Ashby and change trains for Leicester.
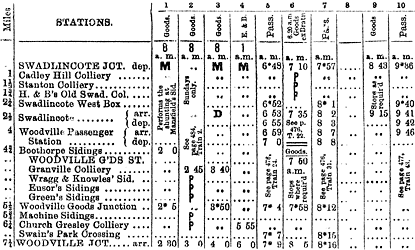
An extract from the working timetable on March 1907. Simon Swain collection
The lack of success of the Swadlincote Loop for passenger traffic is a little surprising, although line occupation was dominated by heavy freight traffic. The Burton & Ashby Light Railway, which was opened in 1906 and owned by the Midland Railway Company, was effectively running in competition with the trains. The tramway ran for 11½ miles from Burton-on-Trent through Swadlincote and Woodville to Ashby at ten minute intervals. One wonders why the tramway was built when local train services could have been improved by the provision of convenient halts and the introduction of a steam rail motor service, something the Midland often did with local branch services.
The period following the First World War saw the slow and terminal decline of passenger services over the loop. It is not surprising that the trams were the first casualty of this public transport rationalisation. Services between Ashby and Burton via Swadlincote and Woodville were withdrawn on 19th February 1927. Passenger services over the loop, which had never been either frequent or well timed, were gradually wound down until the service consisted of just one train in each direction. With this level of service, closure to passengers was inevitable and this came on 6th October 1947.
After this date a great variety of excursion traffic continued to use the loop. The most regular special workings were those to Derby County football matches which ran outward on Saturday lunchtimes or midweek evenings throughout the season, returning after the final whistle. Other frequent specials included a late Friday night holiday train to Blackpool during the summer months, with the return working mid-afternoon Saturday, often producing a pair of engines at the head of the train; on some occasions named locomotives were seen. Theatre trips, Sunday School outings and day trips to Skegness and Alton Towers were some of the other excursion destinations.
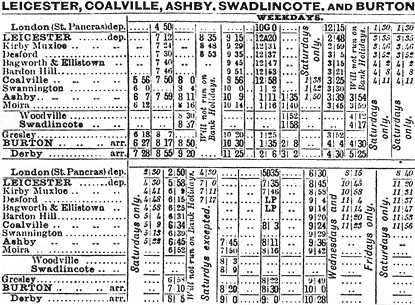
The timetable from October 1912. Simon Swain collection
During this period the loop would occasionally be used for Burton to Leicester services diverted off the main line near Gresley. The section of line between Swadlincote and Woodville junctions was prone to be affected by significant mining subsidence and the loop was a useful diversionary route when remedial work was required. Sadly, the line closed to these remaining passenger services on 8th September 1962.
Following the cessation of regular passenger services in October 1947, freight traffic remained strong for a number of years; however, by the late 1950s, local traffic had begun to diminish and, as the 50s became the 60s, rationalisation was at the heart of both British Railways and local industry. Many of the pipe yards had closed and those remaining transferred their output to road traffic. For its last few operational months, the Swadlincote Loop reverted to its origins, being worked as two separate branches due to the closure of Woodville Tunnel owing to fears over the structure’s safety. The inevitable closure came on 2nd March 1964 and with it the end of over 100 years of operation.
The route today
Following its closure, the Swadlincote Loop metals remained in situ for over 12 months before the dismantling crew arrived; however by the end of 1965 all the track had been lifted apart from the short section from Swadlincote Junction to Cadley Hill which was retained for the colliery. In the years that have followed, nearly all of the industry that generated so much traffic for the loop has disappeared and its course has been encroached upon in a number of locations to the extent that now only a few sections of it survive. Unless one knew that a railway had once run through the area it would be difficult to imagine that it had done so.
As we have previously mentioned, the junction with the main Burton to Leicester line remains in situ, albeit extremely overgrown. From this point it is also possible to discern the remains of the embankment of the Bretby colliery branch which left the main line just a few hundred yards before Swadlincote Junction. The track remains in situ for approximately half a mile to the site of the exchange sidings which once served Cadley Hill Colliery and the bridge carrying the A444 over the line also remains.
Beyond here the trackbed has been completely obliterated by a combination of opencast mining and the development of heavy industry. Very little remains of the route until the outskirts of Swadlincote are reached. A public footpath runs parallel to its course for a short distance on the approach to the site of the crossing at Darklands Road; however immediately beyond this crossing a modern housing development has been built over the route.
Of Swadlincote Station very little remains apart from a small section of the Burton platform; however the substantial blue brick bridge – constructed to take Midland Road over the line – is still extant. The site of the goods yard at Swadlincote has now been redeveloped as a small retail complex although the goods shed and offices were still there in the 1980s. On Belmont Street there remains one of the concrete posts which marked the site of where the branch to Wragg’s & Woodward’s pipe works crossed the street.
From Swadlincote a majority of the line’s course has been lost until Hartshorne Road is reached. From here it is possible to reach the trackbed and walk as far as the site of Woodville Station, of which nothing remains. Beyond it is possible to trace the course of the line as it headed towards Woodville Tunnel. The next point of access is the extant bridge which carried Moira Road over the railway; a public footpath follows the route before deviating to serve a new housing complex. It is still possible to see the densely overgrown embankment as the formation makes it way towards Occupation Lane. Here the red brick parapets of the bridge that took the railway over the road remain, complete with its British Railways Board structure number.
The course of the line is again lost until Bridge Street in Albert Village. Here it is still possible to see where the line would have crossed the road, although no trace of this bridge exists. As the line headed towards Woodville Junction, its course has been utilised for recreational purposes and a network of footpaths have been made for leisure use as this area now forms part of the National Forest. One of them leaves the trackbed at approximately the same location as the Gresley Colliery branch would have done and it is possible to follow this route as far as the site of the colliery, today used by a local haulage firm. Until quite recently remnants of rails could still be seen in the yard, but these have now gone.
Returning to the loop line, the footpath follows its course as far as Swains Park crossing where the line crossed Occupation Lane and recently another footpath has been constructed along the trackbed as far as Woodville Junction itself. The 1990s saw the construction of an opencast coal screening plant which significantly changed the track layout at this site; the junction itself was lost. Today the Burton to Leicester line remains in use for occasional freight traffic, however even this has been greatly reduced in recent years.
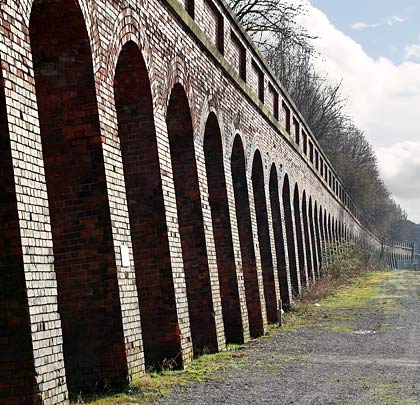
Opened by the Lancashire & Yorkshire Railway in 1875, the 1.6-mile branch from Greetland to Stainland was built to serve local textile mills. Passenger services ended in 1929 but coal, yarn and cloth continued to be transported by goods train until September 1959.
Despite its short length, the double-track branch boasted two substantial viaducts – 13-arch West Vale being the longer at 230 yards. Today it benefits from a Grade II listing and hopes remain that, despite some local opposition, it will open as part of a cycleway. Stainland Viaduct comprises 14 arches but is only 179 yards long.
The two original stations at West Vale and Stainland & Holywell Green were joined by Rochdale Road Halt in 1907.
The line climbed a gradient of 1:60 in places. Today sections of its trackbed are open as footpaths although some of the cuttings have been infilled. Part of the substantial embankment at the south end of Stainland Viaduct has been removed.
(Stephen Craven/Humphrey Bolton’s photos are taken from Geograph and used under this Creative Commons licence.)
November 2012
Stainland branch
Ossett-Batley railway
1/9
<>
The departure platform for Ossett-bound services at Batley Station. The tracks in the foreground also head to Ossett, via Shaw Cross.
In 1864, the West Yorkshire Railway made an end-on connection with a branch of the Bradford Wakefield & Leeds Railway at Ossett. This created a through route from Wakefield Westgate to Batley and resulted in a new station opening in Ossett, closer to the town centre. The original terminus of the BW&L branch was then renamed Flushdyke.
On 1st May 1874, the Great Northern opened a spur from Runtings Lane Junction at Ossett to its new goods depot on Railway Street in Dewsbury. This facility survived until 1933 but the line serving it was reopened by BR between 1965-95. April 1880 saw the GN complete a ‘loop’ line to Batley via Dewsbury which was used by somes services between Bradford and London King’s Cross.
The route featured three short tunnels – Earlsheaton (179yds), Leeds Road (Dewsbury)(213yds) and Batley Carr (161yds). The section from Dewsbury Central Station towards Batley involved a rising gradient of 1:53 to the north, with the tracks accommodated above a retaining wall almost 400 yards in length. It then dived under the LNWR Dewsbury-Batley line before launching itself over the valley on a viaduct comprising a plate girder span, five masonry arches, a second girder span and another stone arch. This ran parallel, but at a lower level, with the LNWR’s Batley Viaduct. Beyond this is the station which formerly had its own island platform for loop trains.
Eastwards from Earlsheaton, the tracks were carried on an embankment as far as Runtings Lane Junction and then again between the junction and a bridge over The Green in Ossett. This led to the town’s substantial station with goods facilities.
Stopping passenger services were withdrawn in September 1964 with goods traffic continuing until the following February.
The entrance facade to Dewsbury Central has been preserved and sections of the trackbed towards Ossett are used as a footpath. Plans are being progressed for a continuous walking route between the two towns via Earlsheaton Tunnel. Batley Carr Tunnel has been backfilled south of its central ventilation shaft, with the other half used by a scrapyard. The tunnel beneath Leeds/Wakefield Road was opened out when Dewsbury’s ring road was built. Batley Viaduct was demolished in the 1980s. Only the station house survives on the site of Ossett Station, which now hosts a housing estate.
(Ben Brooksbank’s photo is used under this Creative Commons licence.)
April 2011
Ossett-Batley railway
Nottingham Suburban Railway
1/8
<>
The bridge carrying Woodthorpe Drive has been filled but its former transport role has been commemorated.
In the 1880s, the city of Nottingham had expanded into its surrounding villages and hamlets which, in turn, had grown into suburbs. These needed to be connected to the rail network. At this time the only competition to the railways came from horse-drawn trams and omnibuses which were slow, could only carry light loads and not travel long distances.
The 1860s and 1870s had seen the unrivalled success of the London underground railway system and its associated commuter lines so, in the late 1880s, a group of Nottingham businessmen felt that the creation of a railway on similar principles would benefit the city’s rapidly growing suburbs.
Historical development
The Great Northern Railway had opened its Derbyshire extension line into Nottingham in 1878; however its principal concern had been to link up the numerous coal mines to passenger traffic. In addition, trains had to make a 7¼ mile circuitous journey from Nottingham, firstly travelling eastwards to Colwick & Netherfield before heading north-west through Gedling, Mapperley and Daybrook to Basford which, on a direct route, was a mere 3¼ miles from the city centre. The Nottingham Suburban Railway, so its backers thought, could complement the Great Northern’s extension line as well as providing a more direct route into the city. An agreement was arrived at whereby the GN would work the proposed line, providing all the locomotives, rolling stock and staff; in return it would retain 55% of the gross receipts. Despite this arrangement, it is worthy of note that the Nottingham Suburban Railway company remained an independent entity until 1st January 1923 when it was absorbed by the London & North Eastern Railway.
Passengers were not the only motivation for the line. One of the leading promoters, Robert Mellors, was chairman of the Nottingham Patent Brickwork Company whose works were on the proposed route at Thorneywood and it was put forward that a branch be built to serve them. This plan received approval from a director of the company, Edward Parry, who would go on to become the line’s chief surveyor and structural engineer. The branch would become the only one of note from the line, running a distance of just 198 yards, of which 110 were in a tunnel taking it beneath Thorneywood Lane before climbing an inclined plane along which wagons were hauled to and from the brickworks.
The company obtained its acts during 1886 and these were strongly supported by Nottingham City Council. By October 1886, Parry had surveyed and staked out the route. Construction work began in June 1888. Some 3¾ mile long, it ran from a junction with the Great Northern Railway at Trent Lane and headed north to another junction with the GN’s Derbyshire extension line at Daybrook. Intermediate stations were built at Thorneywood, St Ann’s Well and Sherwood.
Because of the hilly terrain, the railway proved extremely costly to build, with one-sixth of it built in four tunnels, the longest being just over quarter of a mile long. In addition, there were seven brick-arched bridges, nine girder bridges of which three were over 100ft in span, eight culverts and numerous retaining walls, embankments and cuttings. Construction costs were increased by a third as the Midland Railway insisted that all bridges carrying the line over its metals were at least 50ft wide whilst the Great Northern demanded a flyover at Trent Lane to avoid conflicts on their Nottingham-Grantham line.
Despite these adversities, the line was completed by 23rd November 1889 and opened to both passenger and goods traffic on 2nd December of that year.
Looking through the overbridge at Sherwood Station in 1904.
The route described
Inbound trains ran from Daybrook via the three intermediate stations and then via Trent Lane Junction into the Great Northern’s London Road terminus. Each of the three stations lay in their own valleys with generous platforms in anticipation of the large-scale commuter traffic which unfortunately never developed.
The 70-yard Ashwell Tunnel formed part of the approach to Sherwood Station which had facing platforms built around a curve, spanned by a road bridge and wrought iron lattice footbridge for passengers. The buildings were brick built with wooden awnings and a decorative fringe. The station had its own dock and cattle pen together with a weighbridge and office. The signal box was situated on the Down side just to the north of the platform end.
South of the station the line entered Sherwood Tunnel. This was curved, built on a gradient of 1 in 70 and 442 yards in length; it would have been 10 yards shorter had the farmer at Top Coppice Farm not insisted that it be lengthened to avoid disturbances of his yards.
From there, the line climbed on a gradient of 1 in 50 to St Ann’s Well Station. Its red brick buildings were similar in design to those at Sherwood but the platforms were longer and straight. Here the Up platform was of wooden construction giving it more of a temporary feel. The railway crossed Wells Road on a substantial skew bridge beside which was the passenger approach to the station. On the Down side was a small dock and the platforms were spanned by a wrought iron lattice bridge. The signal box stood at the north end of the Up platform but was taken out of regular use on 28th October 1904, thereafter being opened and operated by the stationmaster when required for dealing with traffic.
Departure from St Ann’s Well saw the line pass through Thorneywood Tunnel (408 yards) to emerge into a cutting beside Thorneywood Lane where Thorneywood Station was built. The east side of the cutting was strengthened by a massive blue brick retaining wall at its northern end. The platforms were straight and opposite each other; again, the buildings shared their design with Sherwood and St Ann’s Well. Approach to the station was from Marmion Road on the west side and a lattice girder bridge spanned the goods yard, linking Marmion Road with Thorneywood Lane. The booking office was on the Down side and a further lattice bridge connected the two platforms. The signal box was on the Up platform and there was a siding on each side of the main line.
Leaving Thorneywood Station the line passed beneath Carlton Road after which the short branch diverged to serve the brickworks. Just 154 yards south of the station, the line entered the 183-yard Sneinton Tunnel before crossing Sneinton Dale on an impressive three-arch blue brick viaduct. From here, on falling gradients, the line passed over the Midland Railway’s Nottingham-Newark line and the Great Northern route from Nottingham to Grantham before finally spanning Trent Lane and making its way along Great Northern metals to the London Road terminus.
The platform canopies at St Ann’s Well reach out to each other.
Operational history, decline and closure
In 1890, there were ten trains a day running out of London Road along the line to Daybrook, four of which continued through to Newstead. In the opposite direction were nine trains of which four originated from Newstead. There was no Sunday service. The journey time from Nottingham to Daybrook was a very respectable 13 minutes. By 1895 there was a through train to Ilkeston which, on Fridays, was extended to Derby Friargate.
Unfortunately, within a little more than ten years, two developments occurred that would render the Nottingham Suburban Railway superfluous. The first was the arrival of the Great Central Railway which, in 1900, had opened up an even more direct route into Nottingham. Trains along the GC’s own Leen Valley railway could run directly from Newstead via Bulwell, New Basford and Carrington into Victoria Station, thus cutting out the lengthy negotiations of Daybrook Junction and Leen Valley Junction on the Great Northern route.
The second was the introduction of the electric tram. Horse-drawn trams had been operating in Nottingham since September 1878; however the arrival of the electric tram offered a quicker, more frequent service than the trains. The first route opened to Sherwood – running along Mansfield Road close to Sherwood Station – on 1st January 1901. Extensions to St Ann’s came on 21st February 1902, Thorneywood on 16th December 1910 and Daybrook on 1st January 1915. With their comparatively light loads and easy acceleration, the trams could negotiate the gradients in the hilly east of Nottingham more easily than steam locomotives. Indeed the clanging of the tram bell would, in the coming years, often sound the death knell for many a suburban railway station. The 1 in 49 gradient from Trent Lane Junction, which was also on a curve, posed particular problems for the GN’s Stirling 0-4-4 tanks which worked the line.
In order to achieve faster journey times than the trams, some of the suburban services were run non-stop from London Road to Daybrook. By 1914, whilst there were still eight trains a day each way along the line, only four of these stopped at the intermediate stations. For example, St Ann’s Well saw departures for Basford & Bulwell at 7.55am and, to Shirebrook, at 9.11am, 1.20pm and 4.58pm. In the opposite direction, trains departed for Nottingham at 8.24am, 2.21pm and 6.01pm. It is also worthy of note that other trains passed through the station at 11.38am, 8.40pm and 9.50pm en route to Shirebrook and to Nottingham at 10.36am, 12.59pm, 9.20pm and 10.41pm. Even before the closure of the intermediate stations – which at this time was less than two years away – more passenger trains passed through than stopped. One can only imagine the long deserted platforms at St Ann’s Well which, just a few years earlier, had anticipated unprecedented numbers of customers.
As a supposed wartime economy measure, the stations at Sherwood, St Ann’s Well and Thorneywood were closed to passenger traffic on 13th July 1916 and thereafter just two trains a day along the Leen Valley route used the line. After the war it became evident that the Great Northern had little interest in promoting services along the line nor reopening the intermediate stations. Bradshaw’s Railway Guide of July 1922 shows that, just prior to grouping, only three trains passed daily over the line.
On 25th January 1925 the collapse of Mapperley Tunnel on the Great Northern extension brought a brief flurry of activity for the Nottingham Suburban when all Leen Valley passenger and coal traffic was diverted over the line whilst repairs were affected.
Also, on 10th July 1928, their majesties King George V and Queen Mary opened the Royal Show at Wollaton Park and the new university buildings. Between these two events, their majesties reviewed a huge gathering of school children in Woodthorpe Park. As the nearest station was Sherwood, both Thorneywood and Sherwood stations were renovated and restaffed for the occasion. This made it possible for 6,550 of the 17,500 children and 284 of their teachers to be brought in on 13 special trains. It is ironic that, on that one day, the two stations saw more activity than they had ever done during their operational days.
The line was converted to single track with the removal of the Down line on 9th February 1930 when the signal box at Sherwood was closed and all signalling removed. The line was then worked by staff who unlocked the ground frames controlling the siding connections. Not long after, the footbridges and canopies were removed from the stations, a clear indication that they would never reopen. The last passenger train to use the line was the 5.05pm Nottingham Victoria to Shirebrook via Trent Lane Junction on 14th September 1931. Services had lasted just 41 years, with the intermediate stations faring even worse with an operational life of just 26½ years.
The next misfortune to befall the line occurred on the night of 8th May 1941 when, during Nottingham’s worst air raid of the Second World War, considerable damage was done in the Sneinton area. A bomb landed on the southern section of the line damaging a bridge over the Midland Railway and blowing away part of the embankment. This was never repaired and buffer stops were erected at either side, effectively creating two dead ends.
Subsequently the goods service along the line was reduced to a thrice weekly pick up, carrying domestic coal between Daybrook and Thorneywood only. But even this ended on 1st August 1951 thus bringing the story of the Nottingham Suburban Railway to an end. The last ever passenger train to run over the line had been a chartered enthusiasts’ special between Daybrook and Thorneywood on 16th June 1951. Apart from a short section at Daybrook, the tracks were lifted between June and October 1954. When the connection at Daybrook Junction was removed on 24th February 1957, the end of the line had truly come.
The goods yard at Thorneywood did reasonable business.
The route today
Today little evidence remains of the Nottingham Suburban Railway. Being situated in the city’s suburbs, both residential and industrial developments have obliterated most traces of it.
The site of Sherwood Station is now occupied by two blocks of flats known as Winchester Court. Their lock-up garages follow the curve of the former railway’s course, however the portals of Sherwood Tunnel are fenced off and hidden by dense vegetation.
The station house at St Ann’s Well remains, as do the abutments of the blue brick skew bridge over Wells Road. The cutting leading to Sherwood Tunnel was at one time used as a nature reserve by a local school.
Thorneywood’s station house still exists and the line’s course from there to Sneinton Tunnel has been made into a footpath. The latter’s portals have been partially obscured by infilling but access into the bore is still possible for members of the local gun club. Descending to Sneinton Dale, nothing remains of the three-arch viaduct which once took the line over it and the site is now occupied by a doctor’s surgery, medical centre and police station. The footpath resumes at a point just south of Sneinton and follows onwards to Colwick Road where the bridge has been removed. The girders of the bridge over the Midland Railway have gone; however the segmental arch and abutments at Trent Lane still exist.
Few people are now aware that the Nottingham Suburban Railway existed. The line which was built to serve early commuters has almost disappeared but one cannot help wonder whether it might have found a fruitful role today, when we are all being urged to ditch the car in favour of public transport. Could it have formed the basis of a regenerated public transport infrastructure in the city? We will never know.
The Lancashire & Yorkshire’s 3½-mile branch to Meltham was authorised by an Act of Parliament in June 1861, with construction getting underway three years later. Landslips made this a protracted business – the first goods train did not run until August 1868 – and the line was breached within weeks, delaying its opening to passenger traffic until the following July. The single-track branch boasted three intermediate stations – Woodfield, Netherton and Healey House – although the former only survived for one month in the summer of 1874!
The track diverged from the Huddersfield-Penistone line just south of Lockwood Station, passing through woodland before reaching Beaumont Park. Two tunnels then escorted the line through the hilly section into Netherton.
Butternab Tunnel’s northern portal is reached via a long approach cutting with retaining walls. It boasts a distinctive design, one that is mirrored at its southern end and at Netherton. Curving to the west, the 256-yard bore is lined in engineering brick and has frequent refuges in both walls. A dwelling has been built on the trackbed close to the southern entrance – that end of the tunnel having been converted to accommodate the householder’s cinema room!
At Netherton, the line entered another tunnel – this one is straight and a little longer at 333 yards. Its eastern section has vertical sidewalls but the profile soon changes to a pronounced horseshoe shape. Netherton Station and goods yard were immediately beyond the west portal. The site is now occupied by farm buildings.
The line then clung to the side of the Hall Dike valley on its approach to Healey House. A yard was provided east of the station, close to Crosland Hall. On leaving the platform, Meltham-bound trains then entered the 30-yard Healey House Tunnel.
Cuttings and embankments carried the remainder of the branch into Meltham, crossing the main Huddersfield road (B6108) on a skew bridge which was removed shortly after closure. Meltham’s extensive goods yard was at a lower level than the station and reached via a junction around one-third of a mile further east. The station itself had a single platform and a footbridge providing access into the town centre.
The route’s passenger service was cut on 23rd May 1949 but goods trains continued to serve local businesses until April 1965.
The engine shed at Meltham was partly demolished in 1903 and removed completely in the early Fifties. A supermarket and car park now occupy the station site whilst housing has consumed the former goods yard. Around three-quarters of a mile of trackbed has been secured as a footpath known as the Meltham Greenway. The local council aspires to further extensions but these are complicated by development on the alignment and landowner issues, not to mention funding.
(UrbanOutlaw’s photos are used under this Creative Commons licence.)
The 31½-mile Cockermouth Keswick & Penrith Railway was built between 1862-64, connecting the industrial centres of Workington in the west with Durham in the east via the lofty Stainmore line. It was built primarily with mineral traffic in mind; the first train ventured over its alignment on 26th October 1864.
The 18 miles of route between Penrith and Keswick included 78 bridges, of which eight cross the River Greta in a three-mile section between Threlkeld and Keswick. These bowstring structures were engineered by Thomas Bouch of Belah Viaduct (and Tay bridge) fame, four of them have their main girders beneath the deck, with a conventional plate girder between them. Some had additional bracing and cross beams added at a later date to handle heavier loads.
The railway here was single line, falling towards the west on gradients of between 1:76 and 1:117. At Wescoe an outcrop of rock is holed by a 24-yard tunnel (bridge 72) whilst, just west of Bobbin Mill siding, a longer bore of 92 yards took the line beneath the A66. This is now buried although the upper part of the east portal remains visible.
Closure of the route came in two stages – the Cockermouth-Keswick section lamenting its last train in April 1966, whilst the line eastwards to Penrith survived until 6th March 1972, although part of this was retained as a siding to serve the Flusco quarry for another three months.
Though much of the alignment between Keswick and Workington has been lost to the A66, the section through the Greta Gorge remains largely untouched. This allowed the Lake District National Park to create a four-mile footpath along it after acquiring this part of the former trackbed.
(Ian Capper’s photos are used under this Creative Commons licence.)
November 2010
Keswick-Threlkeld railway
Hook Norton
1/7
<>
Hook Norton was home to two iron viaducts. Their girderwork was dismantled for scrap but the piers still survive.
The Banbury & Cheltenham Direct Railway opened in stages between 1855 and 1887. The section around Hook Norton was the last to be constructed, costing the lives of nine men. It included two substantial iron viaducts as well as a 418-yard tunnel.
Hook Norton No.1 Viaduct comprised seven girder spans at a height of 60 feet which carried the line for 188 yards. A little further south was the larger No.2 viaduct, 296 yards in length with eight spans perched 85 feet above the valley floor.
The single bore Hook Norton Tunnel is often goes by the name of Swerford Park, a village slightly closer to it.
A landslide bought traffic to a premature halt on the section between Rollright and Hook Norton on the 30th September 1958. It never started up again.
December 2011
Hook Norton
Halifax-Queensbury railway
1/11
<>
A high-angle view of Queensbury's triangular station, captured with its now-disappeared viaduct in the eighties.
<>
The Halifax & Ovenden Junction Railway Act was passed in 1864 but it was not until 1874 that the two-and-a-half mile line opened to freight. The route, which was backed jointly by the Great Northern and Lancashire & Yorkshire railways, included a substantial viaduct of 35 arches at its southernmost end and two tunnels.
Four years later, the GN opened an extension of a little over two miles from Holmfield to Queensbury via a 59 feet deep cutting at Strines – around 1000 yards in length – and a tunnel of 2501 yards, climbing a 1 in 100 gradient in the process.
Withdrawn in 1955, the passenger service operated to and from Bradford but connections to Keighley were available at Queensbury’s triangular station. Goods traffic over the northern part of the route survived for another year and continued as far as Holmfield until 1960, serving the high level branch to St Pauls. Freight services between North Bridge and Halifax’s GN/L&Y joint station continued until April 1974.
May 2009
Halifax-Queensbury railway
Butterley-Langley Mill Railway (1#3)
1/7
<>
Butterley Junction - now the site of Hammersmith Station on the preserved Midland Railway Centre line.
The Butterley to Langley Mill branch of the Midland Railway was not one of the most celebrated lines to be built by that company. Indeed, many people reading this article may never have heard of it. No more than six miles in length, it ran through the industrial heart of east Derbyshire.
Industry – in particular coal and iron working – was well established in the Ripley and Heanor areas by the 1870s but despite this there was no direct rail link between the two towns. As early as 1872, the Midland Railway had proposed to link Langley Mill with Ripley and Butterley by extending an existing branch which served Bailey Brook colliery. However, the Butterley Company, whose lines the proposed railway was to have run over, opposed the route. Again in 1876 a further scheme for a line over a less favourably graded route proved unsuccessful.
This may have been the end of the story had it not been for the Great Northern Railway’s incursion into the Erewash Valley. In 1876 the company had opened the first section of its Derbyshire extension lines, between Nottingham and Awsworth, with another branch heading northwards to Pinxton. By April 1878 they had opened in their entirety. The company’s route had been specifically chosen to serve as many of the Erewash Valley’s industries as possible and was estimated to earn over £50,000 per annum in revenue.
A proposal in 1882 for an independent line from Ilkeston to Alfreton via Heanor and Ripley and the subsequent surveying of a route from Ilkeston to Heanor by the GN probably convinced the Midland that it needed to be the first of the two companies to complete the link between Ripley and Heanor.
The Heanor area had been served by a growing network of mineral railways, owned by both the Midland and independent concerns, since about 1850. Despite this, little thought had been given to the provision of passenger facilities. The MR saw Langley Mill Station on the Erewash Valley line as providing adequate enough passenger facilities for the population of Heanor. In fact the station was known as ‘Langley Mill for Heanor’ from its opening in 1847 until it became ‘Langley Mill & Eastwood’ in November 1876. The change in name presumably occurred to distinguish the station from the similarly titled ‘Eastwood & Langley Mill’ on the Great Northern’s Pinxton branch.
By the early years of the 1880s, the Midland Railway would have been acutely aware of the disastrous effects in failing to provide a direct link between Ripley and Heanor. When the GN arrived in the Erewash Valley a little under a decade earlier, it had been petitioned by the residents of Kimberley, over the border in Nottinghamshire, to provide them with access to the rail network. This was something that the Midland Railway had failed to do when expanding its local network. The Great Northern duly obliged and the station was opened in 1875/6 to goods and passengers respectively. The company continued to address the demands of the local population and a station at nearby Awsworth was opened in November 1880.
In an attempt to regain some of the passenger revenue lost to the Great Northern, the Midland began operating passenger trains along the previously freight only Bennerley Junction to Basford Junction line on 1st September 1882, as something of an after-thought. Passenger stations were opened at Kimberley – to compete directly with the Great Northern – and also at Watnall where there was no GN passenger service. The line was located in a railway backwater and took a meandering route into Nottingham. As a result, such services never seriously rivalled those of the Great Northern as they could not compete in terms of either speed or frequency. By January 1917 passenger services along the line had been abandoned – a casualty of the First World War – and were never reinstated after cessation of hostilities.
No doubt, the Midland was anxious not to be caught in the same predicament twice and in 1883 submitted an act for the construction of a line between Butterley and Ripley. The parliamentary sessions for 1884 record the granting of an Act for the section between Butterley and Ripley on 3rd July 1884. In 1886, further Acts were submitted which saw the section between Ripley and Heanor Goods Junction being authorised on 25th June 1886.
Despite the relatively short distance between Butterley and Heanor, the line was not opened to goods and passenger traffic until 2nd June 1890. This was probably due to at least two contributing factors. Firstly, the engineer employed to construct the line, one J P Edwards, had been granted another contract in December 1886 – this one for the construction of the 3¾-mile Nottingham Suburban Railway. Doubtless having two separate lines to build, both requiring significant engineering, would have slowed progress down. The second and probably more important factor was the relocation of the station at Ripley.
The Midland had entered Ripley in 1856 with a branch from the Derby to Sheffield line at Little Eaton, through the rural communities of Coxbench and Kilburn before serving the mining and pottery communities of Denby. The station at Ripley was located approximately a mile south-west of the town centre on Peasehill Road. The construction of the line from Butterley to Heanor caused the Midland to reconsider its provision of passenger facilities at Ripley, with a decision made to relocate the station at a site more central to the town, to the south of Nottingham Road where the line passed through a cutting. The new station was opened to goods and passenger traffic on 2nd September 1889 with the original station becoming a goods terminus from that date, serving this purpose until closure on 31st July 1954.
As has been previously mentioned, the line between Butterley and Heanor was opened on 2nd June 1890. In 1887, the Great Northern Railway had seen its own Act for a branch of 4¼ miles from Ilkeston to Heanor passed through parliament. This line penetrated the Nutbrook Valley and its rich mineral reserves, which had until this time been a stronghold of the Midland Railway. The Midland however would surely have been satisfied that they had reached Heanor first and would have used the time before the Great Northern arrived to consolidate its position within the town. The GN did not begin operating passenger trains to Heanor until 11th July 1891, some 13 months after the Midland, and it was a further six months before the terminus at Heanor was fully opened to handle goods traffic on 1st January 1892.
The route described: Butterley to Heanor
As many of the passenger services to operate along the branch either commenced or terminated at Butterley, the station here seems a fitting place at which to begin a description of the line. It was situated on the Midland Railway’s Crich Junction to Pye Bridge route which had been authorised under the Midland’s Duffield and Selston Acts of 1865, 1866 and 1869, and opened in three sections.
The view west from Butterley Station towards the reservoir that was originally crossed by a viaduct before an embankment replaced it. Photo: Kidderminster Railway Museum
On 1st June 1874, the western section had been opened to serve Swanwick colliery, with the eastern part serving Pentrich colliery opening on 29th July. The entire route was used by goods traffic from 1st February 1875; passenger services started three months later on 1st May. The line was constructed predominantly to tap into the rich mineral reserves in the area; passenger traffic being a secondary concern.
Butterley was its only intermediate station, located to the west of Derby Road where the road from Ripley to Swanwick crossed the line. Access drives from the west and east of the road led to the main station buildings and goods yard respectively. The station consisted of two platforms built opposite each other. The main buildings, situated on the Up platform and built of stone with tiled roofs, were quite elaborate in design with arched windows set into the stonework with decorative lintels and tall ribbed chimney stacks. Passengers wishing to cross between the platforms did so on a wooden board crossing situated at their western ends. The Down platform boasted a substantial waiting room beyond which sat a signal box which was identical in almost every respect to the one at Ais Gill on the Settle & Carlisle Railway.
Leaving Butterley Station, the line headed west, almost immediately crossing Butterley reservoir. This was the largest of three built by William Jessop between 1789 and 1794 to provide water to nearby Cromford Canal. Trains were carried over it on a 260-yard long timber trestle viaduct of 22 spans, each 30 feet in length, and restricted to a speed of 20mph. Between the first and second world wars, the London Midland & Scottish Railway replaced the structure with a stone embankment.
At its western end, Ripley and Heanor-bound services swung away to the south-east whilst the Ambergate line continued westwards towards Crich Junction. After passing over Asher Lane, the Heanor branch crossed the sidings of Pentrich colliery on an impressive 11-span cast iron-decked viaduct. The supporting piers were constructed of Bulwell stone whilst the deck sections themselves were manufactured by the Butterley Company.
A few hundred yards further along, the line passed over an accommodation track for the Cromford Canal – originally used by towing horses whilst their barges negotiated Butterley Tunnel – and the Butterley Company’s branch from Buckland Hollow Junction on the Ambergate-Pye Bridge line. This served the collieries at Lower and Upper Hartshay before continuing to Butterley ironworks, Brittain pit and Swanwick Junction. The arrangement here was quite unusual as the Butterley Company’s line crossed the Cromford Canal whilst another bridge took the Heanor branch over both the canal track and the mineral railway.
The line continued on an embankment before entering the cutting which would take it into Ripley. The railway passed beneath Pentrich Road, Butterley Hill and Outram Street before the cutting widened slightly to accommodate the goods facilities of the new Ripley Station. Whilst the original station there continued to handle a majority of the freight traffic generated, the Midland decided to provide the new station with a small goods shed and sidings for the storage of wagons.
Consisting on two platforms, this was located immediately south of Nottingham Road and was opened to both passenger and goods traffic from 2nd September 1889. The booking hall and office were located in a building which fronted onto Nottingham Road from where access to the Down platform was obtained. Both platforms possessed substantial brick-built waiting rooms whilst a signal box was situated on the Up platform. A cast iron lattice footbridge joined the two platforms near their northern ends. Due to its location in a cutting, the platforms had stone retaining walls to their rear.
The two tracks through the station reverted to a single line before passing beneath Albion Street. To Ripley Junction, the line encountered a falling gradient of between 1:50 and 1:200. This section was used by both Derby and Heanor-bound services. After passing beneath Park Road, the line emerged from the cutting where, to the east of the running line, the sidings to Ripley colliery came in.
The colliery, located further north, was owned and operated by the Butterley Company and served by its private rail network, with the branch leaving its main network at a junction just west of Brittain colliery. The line ran southwards, where a spur headed off to serve Fortyhouse pit. This spur was abandoned when the colliery ceased production sometime around 1890. Continuing southwards, the line eventually reached Ripley colliery, running on to join the Midland’s Derby-Ripley branch near to the old station.
The signalman prepares to hand over the single line token at Ripley Junction in 1926. Photo: National Railway Museum
The line passed beneath Peasehill Road before reaching Ripley Junction where the line to Derby headed in a south-westerly direction. After a short distance the route from the old station joined this branch at Marehay Junction.
Meanwhile, the Heanor branch climbed eastwards on a gradient of 1:50 to pass over the line which ran into Ripley goods station on a 26ft-span stone arch bridge. Continuing on a rising gradient of 1:132, the line headed on its easterly course with the Butterley Company’s Waingroves colliery branch running parallel. This had left the Midland’s line just to the south of Ripley goods station on the spur from Marehay Junction. The line ran only as far as the colliery.
From Waingroves colliery the line began its descent towards Crosshill & Codnor Station, with the road to Waingroves Hall passing over the line on an imposing stone arch bridge. Now heading on a more southerly course, the line ran on an embankment – through which an occupation track from Codnor Denby Lane to Waingroves Road ran – to head through Strelley Wood to reach Heanor Road at Crosshill. When the line was being constructed it was necessary to realign Heanor Road to accommodate it. Before the arrival of the railway the road had climbed on a gradient of 1:13; this was reduced to 1 in 16 as a result of the realignment and construction of the railway bridge.
Waingroves bridge in June 1928, with the signs of subsidence showing themselves. Photo: Mr B Key
Immediately east of Heanor Road was Crosshill & Codnor Station. Located just 1¼ miles from Ripley Junction, it was surprisingly built at a point where there was little local population and throughout its history there was always reliance for passenger traffic from areas of housing within walking distance of the station.
It was the only intermediate station between Ripley and Heanor and was opened to passenger and parcels traffic on 2nd June 1890. There were no goods facilities. The station consisted of a single platform which curved slightly at its eastern end and on which the station buildings were located. Crosshill & Codnor varied in design from Ripley and Heanor which were built to a standard Midland design of the period. Instead it was a red brick building with half timbering to the front elevation, giving a mock Tudor appearance, and with imposing gables and ribbed chimney stacks. This accommodated the booking office and hall, station masters office, general and ladies waiting rooms. A gentlemen’s urinal was located in a separate building attached to its end.
The station was lit by gas lamps on cast iron posts which ran the length of the platform with an additional lamp being fixed to the platform facing elevation of the main building. Access to the station was gleaned either from a flight of wooden steps from the Heanor Road overbridge or from a driveway which descended steeply from Heanor Road to a small forecourt; this extended to the front and side of the buildings. Beyond were extensive gardens. Photographs from the turn of the century show these were immaculately kept, as was the practice during that period.
When the station was opened in June 1890, there was a seven-levered signal box to control a loop to the east. Trains travelling from Heanor had to climb gradients of between 1:66 and 1:86, steepening to 1:50 beyond the station. These gradients meant that catchpoints were required to protect against runaway vehicles. The arrangement was quite unusual as the loop consisted of interlaced tracks. Because the Up track had sprung catchpoints, it meant that the loop was impossible for passing trains on. Partly for this reason the MR decided to dispense with the box and loop, both being taken out of use on 16th March 1896 and dismantled shortly afterwards.
The beautifully kept station serving the communities of Crosshill and Codnor. Photo: Kidderminster Railway Museum
Photographs of Crosshill & Codnor Station give the impression that it was located on a sleepy rural railway backwater, but this was certainly not the case. As the line headed southwards, it ran into the industries that had pushed their way westwards from the Erewash Valley.
The line crossed open agricultural land on an embankment, passing over numerous occupation and farm tracks on either stone arch or cast iron deck bridges. Still on an embankment, it then proceeded to run alongside the western bank of Loscoe Dam. All earlier proposed routes for a line between Butterley and Heanor had alignments running along the eastern side of the dam.
After passing the dam, the railway crossed Furnace Lane to head alongside the Butterley Company’s Ormonde colliery. This had opened in 1908 and rail access was from an extension of the Butterley Company’s branch that served Bailey Brook colliery and had opened as early as 1847, to the north of Heanor. A little further along, the short branch to Loscoe colliery passed beneath the railway travelling south-eastwards from its junction with the Ormonde colliery extension branch. Despite both pits being served by rail, neither had a physical connection with the Butterley-Heanor line.
The line then passed over Taylor Lane on a stone arch bridge to run through the Newlands area of Heanor, on a falling gradient of 1:200 to pass beneath Longbridge Lane and enter the cutting on the approach to Heanor Station. At Ripley the single track doubled to form a loop running into both platforms, with the sidings and line to the goods shed branching off from the main line. However, at Heanor the goods yard and track layout was slightly different. The single line doubled immediately after passing beneath Longbridge Lane, approximately quarter of a mile from the station, with the connections to the sidings and goods yard leaving the Up line and crossing the Down. One of the yard’s sidings was double ended, with one set of bufferstops located beyond the goods shed and another to the east of the Midland Road bridge.
Heanor Station was located immediately to the east of the Midland Road overbridge. Before the arrival of the railway, the road south of its junction with High Street was part of Falls Road. The coming of the railway saw its name change to Midland Road, with Falls Road commencing just beyond the station. The station was built to a standard MR design and was not dissimilar from that at Ripley. The brick-built booking hall and parcels office was located on a driveway just to the east of Midland Road. The driveway continued along the rear of the Up platform whilst passengers accessed the platforms via a wrought iron lattice footbridge which was connected to the driveway by flights of steps. Both platforms were provided with modest waiting rooms as well as toilet facilities. The platforms were lit by gas lamps on standard cast iron posts. The 22-lever signal box was also located on the Up platform.
Another view of Crosshill & Codnor Station with two proud members of staff posing on the platform. Photo: Kidderminster Railway Museum
All platforms at the branch’s stations were of a substantial length which would prove useful in the Edwardian period when regular excursion traffic used the line. Heanor Station was opened to both passenger and goods traffic from 2nd June 1890. The short section from the station to Heanor Goods Junction, where the Bailey Brook colliery line joined the branch, was opened to goods traffic only on 17th November 1890.
The Langley Mill extension
It was probably the opening of the Great Northern’s line from Ilkeston to Heanor that convinced the Midland of a need for a passenger connection south of Heanor. On 11th June 1891 the MR was granted powers to construct a branch of just 39 chains from Heanor Goods Junction to an independent platform to the south-west of Langley Mill & Eastwood Station on the Erewash Valley main line, although this did not afford direct access onto it. Services from Heanor could access the main line by taking the south-east curve at Langley Mill Curve Junction but would then have been unable to access the bay platform without reversing the train.
Just beyond the platforms at Heanor Station, the double track reverted to a single running line. An interesting feature here was the crossover built for Up trains. Ripley and Butterley-bound services would have approached the station on the Down side before crossing onto the Up and into the platform. The line from the Up platform continued beyond the crossover for a short distance before terminating at a set of bufferstops. Given that a loop would have been adequate, the reason for this arrangement is unclear.
From the station, the line travelled eastwards through the outskirts of Heanor – with Bailey Brook colliery visible to the north – before running beneath Mansfield Road on a cast iron deck bridge with stone parapets and piers. Between Mansfield Road and Heanor Goods Junction, the Bailey Brook branch gradually ran in from the north-west. Whilst the Butterley branch passed beneath Mansfield Road, the colliery line crossed the road on a level crossing. This was opened in 1847 and, from Heanor Goods Junction to a point approximately 200 yards north-west of Mansfield Road, was owned by the Midland Railway; the line beyond and the subsequent extensions to Loscoe and Ormonde pits came within the ownership of the Butterley Company.
Heanor Goods Junction, where the two lines met, was situated immediately to the west of Aldred’s Lane where a signal box was located. Like many others along the branch, the bridge there was a cast iron deck affair manufactured by the Butterley Company. From here to Langley Mill Curve Junction, both colliery and Butterley branch traffic would have used the same metals. Originally this short section of just six chains formed part of the colliery line, however after the commencement of passenger services from Butterley to Langley Mill it was absorbed into the latter route.
The line split again at Langley Mill Curve Junction, with one spur heading south-easterly to Heanor Junction thus affording a connection with the Erewash Valley line where there was another junction with a branch running to New Langley colliery. Trains from Butterley took the curve heading north-east, known as Langley Mill curve, into the bay platform. Access to the platform was from a footpath which ascended from Station Road, west of the bridge taking the Erewash Valley line over the road. The platform possessed its own waiting rooms and toilet facilities and was lit by gas lamps. A run-around loop was provided – mention is made of this as neither Ripley nor Langley Mill was provided with such a facility. This meant that trains from Butterley would have to run tender first before running around at Langley Mill to haul the train back locomotive first.
The distance between Heanor Goods Junction and the platform at Langley Mill was relatively short, however progress appears to have been slow and it was not until 1st October 1895 that services began operating along the entire route between Butterley and Langley Mill.


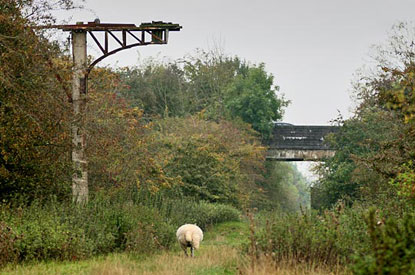
 Dec10
Dec10