Batley Carr Tunnel
Batley Carr Tunnel
![The remaining portal looks out onto a scrapyard.](http://www.forgottenrelics.org/wp-content/uploads/2023/03/image1-75.jpg)
![Substantial pieces of masonry act as intermediary between two sections of brickwork.](http://www.forgottenrelics.org/wp-content/uploads/2023/03/image2-75.jpg)
![Immediately north of the portal is a retaining wall, at the top of which is the existing line between Batley and Dewsbury.](http://www.forgottenrelics.org/wp-content/uploads/2023/03/image3-75.jpg)
![The lower part of the bore has been infilled.](http://www.forgottenrelics.org/wp-content/uploads/2023/03/image4-75.jpg)
![Beyond the only shaft, the tunnel is blocked off.](http://www.forgottenrelics.org/wp-content/uploads/2023/03/image5-75.jpg)
![Sitting on open ground alongside the operational railway, the brick shaft still boasts its pepperpot.](http://www.forgottenrelics.org/wp-content/uploads/2023/03/image6-74.jpg)
![Close to the tunnel, a former siding crosses the street.](http://www.forgottenrelics.org/wp-content/uploads/2023/03/image7-74.jpg)
![The north portal captured from a Batley-bound train.](http://www.forgottenrelics.org/wp-content/uploads/2023/03/image8-67.jpg)
![In November 1973, although the tracks have been lifted, the southern portal of the tunnel remains unburdened by landfill.](http://www.forgottenrelics.org/wp-content/uploads/2023/03/image9-58.jpg)
![Heading towards Dewsbury Central, the trackbed passed beneath a bridge as it emerged from the tunnel's approach cutting](http://www.forgottenrelics.org/wp-content/uploads/2023/03/image10-47.jpg)
![](http://www.forgottenrelics.org/wp-content/uploads/2023/03/image1-75.jpg)
![](http://www.forgottenrelics.org/wp-content/uploads/2023/03/image2-75.jpg)
![](http://www.forgottenrelics.org/wp-content/uploads/2023/03/image3-75.jpg)
![](http://www.forgottenrelics.org/wp-content/uploads/2023/03/image4-75.jpg)
![](http://www.forgottenrelics.org/wp-content/uploads/2023/03/image5-75.jpg)
![](http://www.forgottenrelics.org/wp-content/uploads/2023/03/image6-74.jpg)
![](http://www.forgottenrelics.org/wp-content/uploads/2023/03/image7-74.jpg)
![](http://www.forgottenrelics.org/wp-content/uploads/2023/03/image8-67.jpg)
![](http://www.forgottenrelics.org/wp-content/uploads/2023/03/image9-58.jpg)
![](http://www.forgottenrelics.org/wp-content/uploads/2023/03/image10-47.jpg)
The Great Northern’s route between Dewsbury Junction and Batley included a 161-yard tunnel at Crackenedge, allowing it to pass beneath the LNWR’s line which ran on a parallel course up the valley.
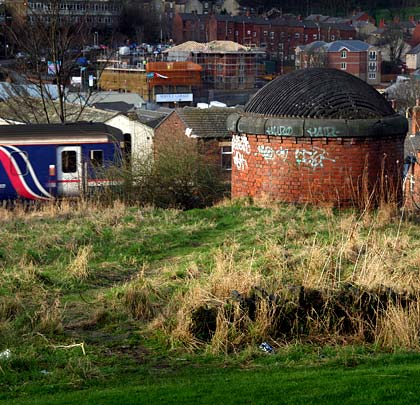
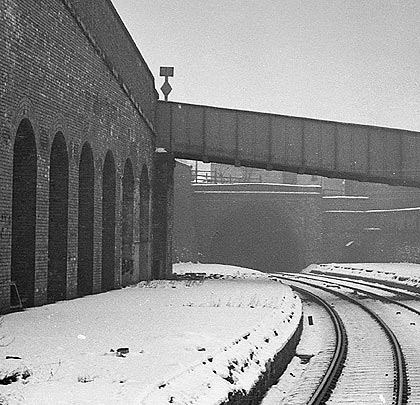
Opened on 12th April 1880, the two-track tunnel curves to the east and includes a single ventilation shaft. Its surface funnel still stands – complete with pepperpot – alongside the operational line. The lining and both portals are in red brick with masonry voissours between them.
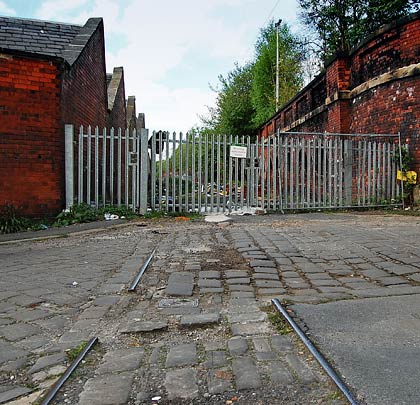
The route closed to passengers in 1964, with all traffic ceasing on 15th February 1965. Since then, the southern portal – which was masonry-built – has been buried and the section up to the shaft backfilled.
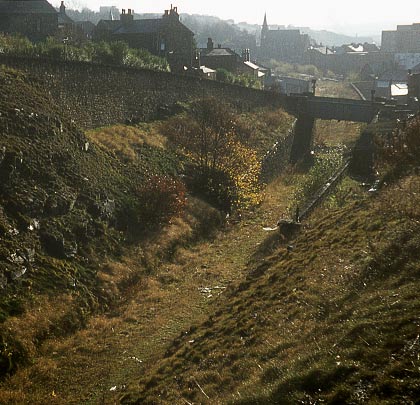
A substantial retaining wall is found immediately beyond the north portal which looks out onto a scrapyard.