


The story of the Severn Railway Bridge: Lost in the fog
The story of the Severn Railway Bridge: Lost in the fog
For business or for pleasure, through need or curiosity, daily life generally entails some form of travel. Anyone employed by the railway can be thankful of that fact. Rarely though do journeys live long in the memory – your eventual destination being the real draw. But what if you never get there? What if fate intervenes? Fifty years ago this month, George Thompson and James Dew set out on separate journeys that would have appalling consequences for five of their colleagues and one bystander – a piece of spectacular railway engineering.
Frenzied development
Today, those robbed of daylight as their train plunges beneath the river between Severn Tunnel Junction and Pilning probably don’t think twice about the engineering of that four-mile black hole. Neither will they care that it was not the first attempt to link the Severn’s west and east sides with a tunnel. Work to extend the Bullo Pill Railway through to Arlingham had reached the river’s midpoint when, on Friday 13th November 1812, an inrush of water flooded the excavation, leading to its abandonment. All lives were thankfully spared.
But the network’s development through much of the 19th century, coupled with the financial rewards to be reaped from South Wales’ colossal coal reserves, were to spawn an abundance of similar visions. None was more audacious than Brunel’s 1844 proposal for north and south-facing bridges – each around 800 yards in length – forming part of plans for a line linking London with South Wales, crossing the water eight miles south-west of Gloucester. The city’s businessmen, alive to the commercial impact of being bypassed, mounted a vigorous and ultimately victorious campaign against it, securing the route still in use today.
The drawing board remained busy with six proposals emerging in 1871 alone. Included within this collection were the Severn Tunnel Railway and the Severn Bridge Railway No.2. The former navigated its parliamentary passage in August 1872, welcoming a trial goods train on 9th January 1886. At its peak, 3,628 men laboured on it. The latter would also come to fruition but those who paid for it probably wished it hadn’t.
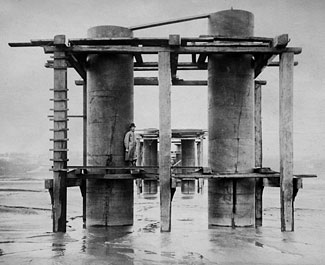
Photo: Gloucestershire Archives (Ref B417/23554)
Conflicting interests

Photo: Gloucestershire Archives (Ref B417/23554)
Engineered by George William Keeling and George Wells Owen, the four-mile Severn Bridge Railway formed a junction with the Severn & Wye and South Wales railways at Lydney, then disappeared into a tunnel of 506 yards before climbing onto the bridge to cross the water. At the east side, it joined a branch of the Midland Railway at Sharpness Docks.
Powers were taken to raise its £278,000 estimated price tag. The Severn Tunnel, which had also been granted Royal Assent, was likely to cost three times as much. Although the distances between London and South Wales via the two routes were comparable, the bridge benefited from gentler gradients; this lulled the company’s directors into believing that they would secure the lion’s share of that lucrative coal traffic.
Running powers over the route had been granted to both the Midland and Great Western railways – they could exercise these through investments of £50,000 in the project. But their conflicting interests brought much delay, eventually demanding mediation. When decision-makers found against it, the initially-supportive GWR walked away to focus its attention on the tunnel.
Bickering and financial navel-gazing gave way to physical progress on 3rd July 1875 as company chairman W C Lucy laid the two-tonne foundation stone. Hamilton’s Windsor Iron Works Co was awarded the £190,000 contract to erect the bridge whilst Vickers & Cooke – later to be replaced by Griffith Griffiths – was tasked with delivering the remaining structures and stations, work valued at £90,000.
Assembly in situ
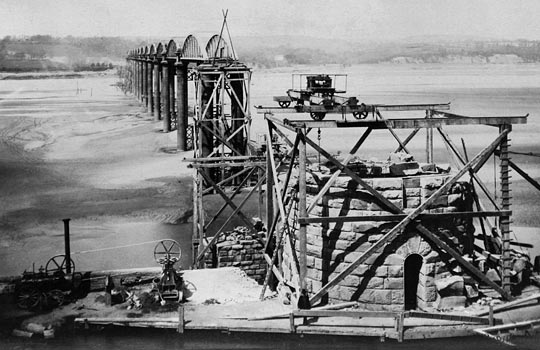
Photo: Gloucestershire Archives (Ref B417/23554)
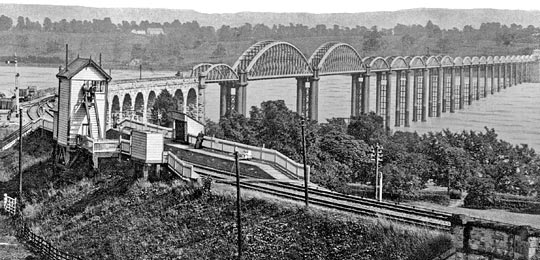
This was a venture of enormous scale and complexity, made all the more formidable by the Severn’s great tidal flows. 4,162 feet in length, the bridge consisted of two spans of 327 feet over the main channel, with 19 lesser spans and a swing bridge at its eastern end across the Gloucester & Berkeley Canal. The western approach was carried on a 13-arch masonry viaduct – no mean feat in itself.
The pier columns were formed of 4-foot cylindrical sections, 10 feet in diameter. The first dozen piers had to be sunk through 28 feet of sand before bedrock was found. Extensive staging was assembled from which the cylinders were lowered on chains bolted to the inside flanges. Felt-lined to deal with expansion, they were then filled with concrete. A primitive piling machine helped to drive the sections through a clay ridge close to the east bank.
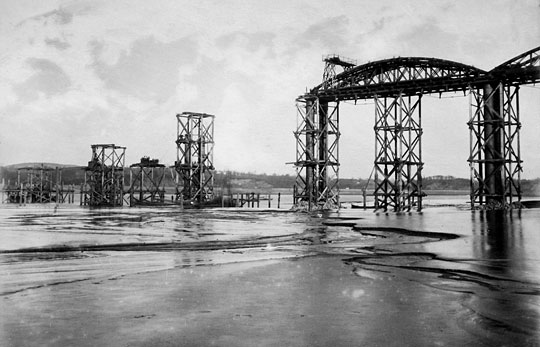
A 10-knot tide rising 30 feet in a little over two hours precluded on-shore construction of individual spans prior to them being floated into position. Instead the staging was extended upwards to allow assembly of the ironwork in situ. This operation attained such efficiency that many of the spans were erected in a week, with bolts used as a temporary fix before the riveters came along to provide a permanent one.
The greatest challenge – that posed by the navigation channel – faced engineers in the autumn of 1878. Initial efforts were thwarted by the tide which washed away the staging and several pier cylinders; massive timber piles were snapped at their base. But the following February brought the first span’s completion. Work on the second benefited from floodlighting, making the introduction of a night shift possible, and reached its conclusion in August. Eight locomotives took part in rolling load tests, deflecting these spans by just 1½ inches. Their construction did though claim the life of workman Thomas Roberts who plunged into the river from deck level, a distance of 70 feet, striking the staging on his way down.
Crowds gathered at every vantage point to witness the first public train rumble over the structure on 17th October 1879. On its return run, a detonator was exploded on each of the 21 spans. After crossing again, passengers got off to accompany W C Lucy onto the bridge where he ceremonially tightened the last bolt. What would the HSE have said? It was an act of great symbolism, not least because 24 hours earlier The Great Spring had penetrated the Severn Tunnel’s top heading, flooding the workings to river level. No progress was made there for over a year.
Brace yourself
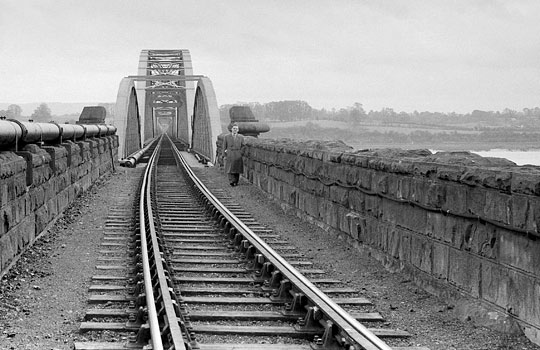
Photo: Brian Hillier
But any sense of smugness was shortlived. Expected traffic levels failed to materialise and the company’s financial resources were drained further by the Severn & Wye Railway – a servant of the Forest of Dean’s ailing coal industry – with which it had amalgamated in 1878. Losses were cut in 1894 when, with most trains heading for the now-open tunnel, the company was transferred to the Midland and Great Western, under the control of a joint committee. The bridge was effectively bankrupt.
In 1955, a detailed examination prepared the way for heavier locomotives to use the structure, providing an alternative route from South Wales to Bristol. The following year, with strain gauges installed to record the deflections, a series of tests was carried out involving two Castle-class locomotives, eight loaded Grampus wagons and a brake van. The outcome was a £125,000 contract let to Fairfields for the strengthening of almost 500 diagonal braces.
Work got underway in 1960, with the firm afforded a nightly possession of the bridge after the last train had passed over at 2145. By late-October, three spans were complete and scaffolding encased a fourth. But suspect ironwork was soon to be the least of the bridge’s problems.
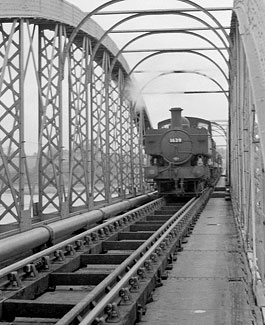
Photo: Brian Hillier
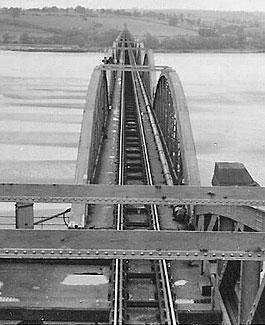
Photo: Brian Hillier
Power of the tide
Calm greeted James Dew, skipper of the Wastdale H, as he eased his vessel out of Avonmouth Docks at around 1915 on the evening of Tuesday 25th October 1960, embarking on the return leg of a journey that had begun in Worcester early that same morning. Travelling with him was a crew of three and 351 tonnes of petroleum spirit. Slightly ahead, he could see the lights of tanker barges which had sailed up from Swansea on the afternoon tide. Amongst them was the Arkendale H, loaded with 296 tonnes of Britoleum fuel oil and captained by George Thompson.
Although visibility was good, the area around Berkeley Power Station – three miles downstream of the bridge – was notorious for thick fog, a function of cool air blowing over the sun-warmed foreshore. And so it was that evening – by 2200, 16 craft were enveloped.
As he passed the power station, Thompson swung his barge around to stem the tide, punching into it at such a rate as to overcome its power. As he reached the piers at Sharpness marking the entrance to its docks, a tug towing several barges crossed his bows, forcing him to kill the power and drift upstream. As he lined up for a second attempt, the Wastdale H emerged from the murk on his port side. On board, Dew was fighting the tide and his ignorance – this was only his third day on the river.
As they came together and unknown to either skipper, a crewman on the bow secured a line between the vessels. They were now inseparable. Thompson and Dew battled to prise their craft apart but succeeded only in losing control of them. Caught by the fast-flowing current, they were pushed upstream towards the bridge. Travelling sideways, the Wastdale H slammed into Pier 17, turning the vessel over. The Arkendale H ended up on top of her. As Thompson emerged from his wheelhouse, the pier and the two spans it supported fell onto the stricken craft.
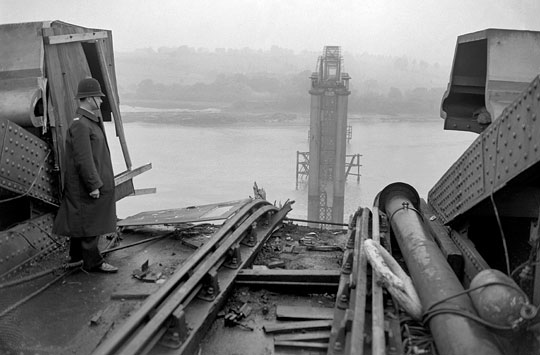
Photo: Press Association
Mounting the rescue
Supervisor T C Francis left the signal box at Severn Bridge Station, on the western bank, at 2230. As he walked down onto the bridge, a sheet of flame burst skyward; an explosion followed. He ran back to the box to call the emergency services. On his return, he was confronted by a hole where once there were girders. Still burning fiercely and burdened by the collapsed spans, the barges were carried upstream before grounding on a sandbank.
Thompson had been struck by flying debris and lost consciousness for a time. Once revived, he found his mate Percy Simmonds and engineer Jack Cooper on the stern. Knowing that neither could swim, he gave each of them a life belt and instructed them to jump. He did, they didn’t. With the river ablaze all around him, Thompson had no choice but to swim for survival.
Dew too was in the water. He clambered on board the Arkendale H where he found the two men wondering what to do next. They had already inflated a life raft but it drifted away. Dew led them onto the deck from where they walked into the water. Cooper was swept to the stern of the vessel and caught by its still-revolving propeller. He was eventually rescued. Remarkably, Dew was found uninjured three hours later, upstream of the bridge. The tide carried Thompson for three miles before depositing him on the bank.
The remaining crewmen – Simmonds (34), Jack Dudfield (46), Alex Bullock (40), Robert Niblett (25) and Malcolm Hart (17) – all succumbed.
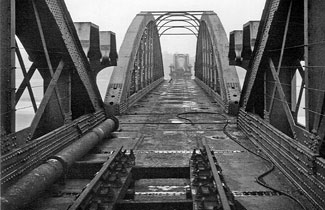
Photo: D J Norton
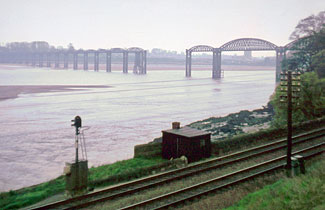
Photo: John Thorn
Accident prone
The fate of the bridge was engulfed by protracted debate. Rebuilding costs were estimated at £312,000 against £250,000 to dismantle it. Local opinion favoured the former as the structure provided an important community link, particularly as the children of Sharpness took the train to and from their school at Lydney on the opposite side.
In December 1961, an underwater survey discovered extensive damage to Pier 16 which was leaning towards the east bank. A contract was awarded to erect a temporary trestle, eliminating any danger of collapse. Days before work started, an upturned tanker drifted into Pier 20 on the ebbing tide, causing a further £13,000 worth of damage. This same pier was again the victim when the contractor’s twin-hulled crane broke from its moorings; the deck’s underside was also struck by its jib. The bill on that occasion was £6,000.
By 1965, British Rail wanted only to cut its losses, having received just £5,000 in compensation for the original disaster. Twenty-four companies were invited to tender for the demolition work; 20 withdrew their bids following a site visit. Nordman Construction – not one of the remaining four – got the job.
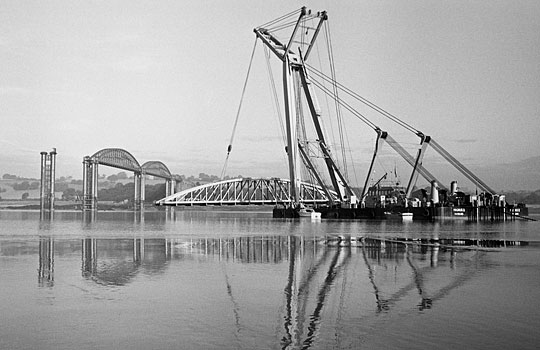
Photo: Press Association
On Tuesday 22nd August 1967, a huge floating crane, Magnus II, was piloted up the Severn. With a propeller at each corner for maximum manoeuvrability, it boasted a lifting capacity of 400 tonnes to a height of 150 feet. When she left three weeks later, the swing bridge, three spans and 21 piers were still standing. It was not until 10th March 1968 – three months after the deadline – that another company, Swinnerton & Miller, finished the job with explosives. It was another two years before the debris was cleared.
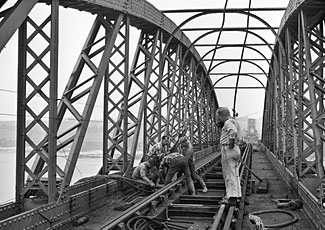
Photo: Press Association
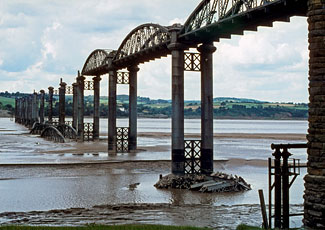
Photo: Peter Coleman/ TammyLynn Photography
Mighty bridges
Whether to go under, over or around was the conundrum posed by Britain’s great rivers when the railway reached their banks in the 19th century. In meeting nature’s challenge, engineers crafted mighty bridges. Whilst the Forth, Tay, Royal Border and Royal Albert continue to shine, the Severn’s lost crossing stands alongside them, if obscured by the mists of time.
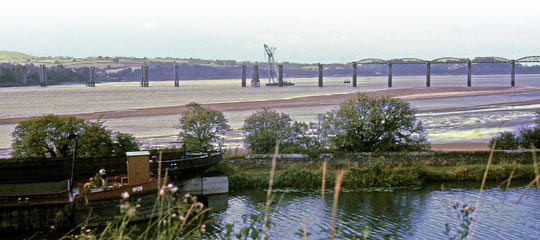
Photo: Graham Edgeworth
Photo: Midland Explorer Boy
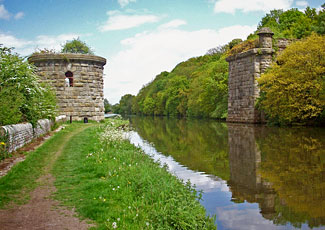
Photo: Midland Explorer Boy
Published October 2010
More Information
| Severn Railway Bridge | Page from Wikipedia |
| Photos by D J Norton | Pictures of the bridge following the disaster |
| Disused Railways | Historical and contemporary photos of the route |
| Severn Tales | Chris Witts’ story of the disaster |
| Brian Hillier Flickr set | Historical and contemporary photos of the route |
| Gloucestershire Archives | Information about the resources available via the archive. |
