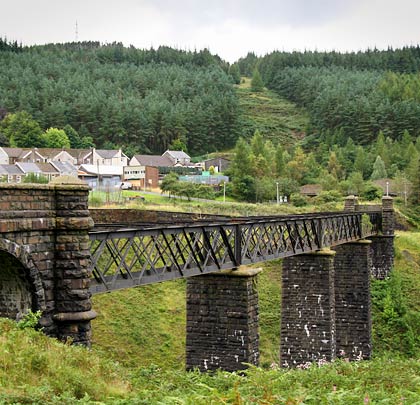
Cymmer Viaduct
Cymmer Viaduct
![The viaduct has three piers, with the middle one standing in the river.](http://www.forgottenrelics.org/wp-content/uploads/2023/03/image1-271.jpg)
![Both abutments incorporate a single arch - this is the southern one.](http://www.forgottenrelics.org/wp-content/uploads/2023/03/image2-271.jpg)
![The deck and parapets were removed following closure in 1970.](http://www.forgottenrelics.org/wp-content/uploads/2023/03/image3-271.jpg)
![One of the bearings takes the strain of two spans.](http://www.forgottenrelics.org/wp-content/uploads/2023/03/image4-268.jpg)
![The cross beams used to support the deck are still in place.](http://www.forgottenrelics.org/wp-content/uploads/2023/03/image5-264.jpg)
![The view south along the girders, showing its gentle curve to the east.](http://www.forgottenrelics.org/wp-content/uploads/2023/03/image6-255.jpg)
![The viaduct stands close to the now-buried north portal of Cymmer Tunnel - marked by a gap in the trees on the hill above it.](http://www.forgottenrelics.org/wp-content/uploads/2023/03/image7-241.jpg)
![With its deck and tracks still in situ, the viaduct is captured in 'atmospheric' South Wales weather.](http://www.forgottenrelics.org/wp-content/uploads/2023/03/image8-212.jpg)
![A northbound service crosses the viaduct on 21st November 1964.](http://www.forgottenrelics.org/wp-content/uploads/2023/03/image9-177.jpg)
![](http://www.forgottenrelics.org/wp-content/uploads/2023/03/image1-271.jpg)
![](http://www.forgottenrelics.org/wp-content/uploads/2023/03/image2-271.jpg)
![](http://www.forgottenrelics.org/wp-content/uploads/2023/03/image3-271.jpg)
![](http://www.forgottenrelics.org/wp-content/uploads/2023/03/image4-268.jpg)
![](http://www.forgottenrelics.org/wp-content/uploads/2023/03/image5-264.jpg)
![](http://www.forgottenrelics.org/wp-content/uploads/2023/03/image6-255.jpg)
![](http://www.forgottenrelics.org/wp-content/uploads/2023/03/image7-241.jpg)
![](http://www.forgottenrelics.org/wp-content/uploads/2023/03/image8-212.jpg)
![](http://www.forgottenrelics.org/wp-content/uploads/2023/03/image9-177.jpg)
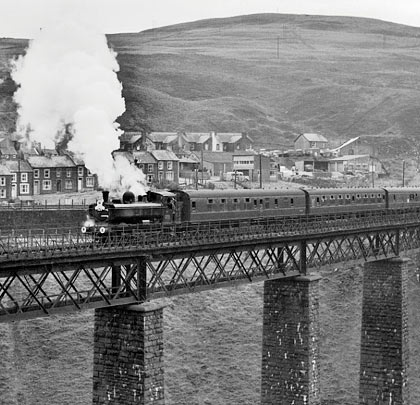
Northbound trains ended their subterranean journey through Cymmer Tunnel to be confronted by a set of points. These would determine whether they curved right to enter Cymmer Afan Station or were launched over the river to take the former South Wales Mineral line to Glyncorrwg and North Rhondda collieries.
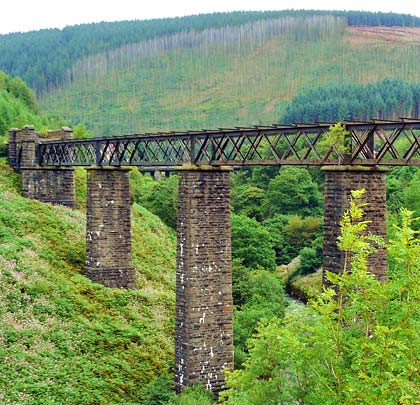
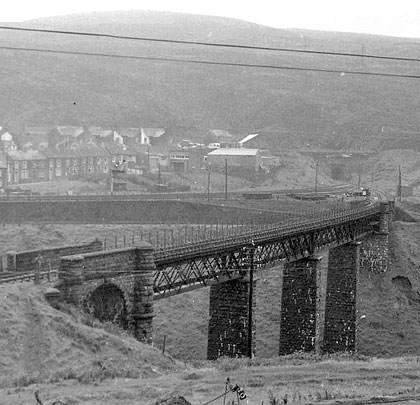
Doing the launching was a viaduct across the deep Afan valley. Built by the Llynfi & Ogmore Railway, it came into use in 1878. Intended to comprise nine masonry arches, a shortage of skilled masons prompted a redesign in favour of wrought iron.
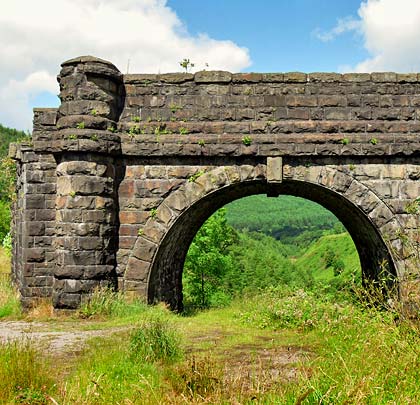
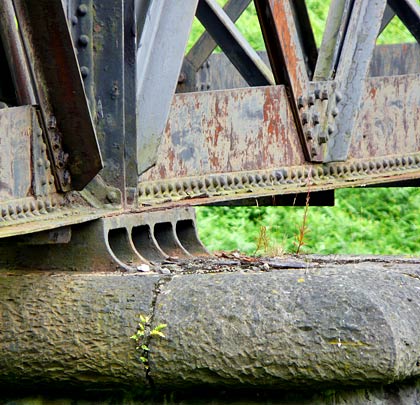
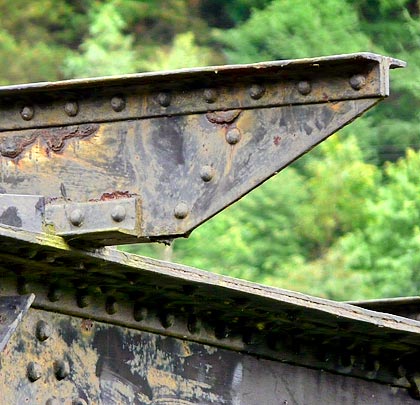
At the end of its southern approach embankment was a plate girder bridge over the two tracks of Rhondda & Swansea Bay Railway; then came the abutment for the main girders incorporating a single masonry arch. Over the valley were four pairs of trusses, each meeting on a tapered masonry pier. Above them were beams on which was placed the wooden deck. The northern abutment also includes an arch.
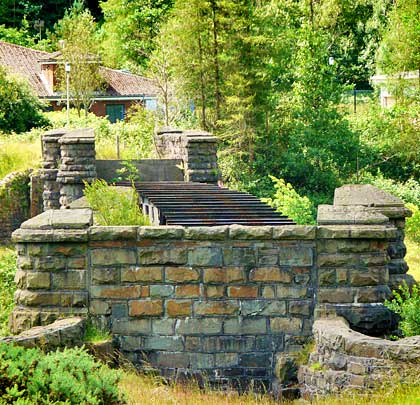
The last train travelled over the structure on 25th June 1970 although it was officially taken out of use on 24th August. Since then the deck and its handrails have been removed; so too has the southern approach embankment. The structure was given a Grade II listing in 2000.